Small(ish) update.
Added 2020-04-04 23:20:25 +0000 UTCHey guys!
I want to give you guys a little update on how the model I’m working on is going. Like I mentioned, she didn’t have face bones, and I had to rig it. I’m glad to say, that step is done, and the flexing? It’s also done, we now can begin to work on the model itself!
However, I would like to, yet again, mention how I do face rigging.
Red and Green.
Bone Groups are just what it means, they are groups of bones which have a color attached to them, that way, you can visually see what group they are from. I follow a very basic rule: Green stay, Red must go. Keep in mind, while you can use Python scripts to target one specific Bone Group, I don’t use them like that, I only use them for visual aid.
Trial and Error.
Right now, I stopped 100% hating face rigged. I’ve come to an acceptance with it. I still don’t like it, I just tolerate it. There are many reasons for this, one of them being it’s a very heavy Trial and Error process.
You see, as far as I’m aware, there is just not a clear way to preview how are going to look the weights once assigned. The only way to do it, is by applying Automatic Weights. Every time I do that, I check on my Green bones and see how the weight is assigned. If a weight doesn’t satisfy me, I add more red bones around it and try again.
The bones I always check are as they follow:
- Jaw Bone (I parent most of the lower mouth Green and Red bones to the Jaw)
- Eyelid Bones (I parent all of the eyelid chain to a root Eyelid bone)
- Eyebrows
- Eyelid Corners
I check those bones because, for me, they are the most problematic ones. Like I mentioned, if the assigned weights doesn’t satisfy me, I will add more and try again. One particular area on this model that was very problematic, were the ears. As you can see, I had to add Red bones around them, and that didn’t even suffice, so I built a branch of bones to them. More on that later.
This is how the final draft looked like.

The lower Eyebrow row was a mistake, I duplicated the Eyebrow bones and just position them where I required, I didn’t change their Bone groups.
Why did you work on just the half of the face you may ask, well, it’s very simple.
Symmetry
The only parts that will not change no matter what, is the middle of the head. Those bones have a regular naming convention: REMOVE.M
The left side of the bones, are all named accordingly: REMOVE.L or Eyebrow 01.L The Remove name is shared to all red bones on the left side, and so, they are named REMOVE.L.001, REMOVE.L.002 and so on. This is all on purpose, because I’m going to use a function called Symmetry. In meshes, if you use Symmetry, what It does is it grabs the mesh and flips it to opposite side. Since it follows the Parent’s Location, it gets symmetrized in the proper position. That’s why if you are using Symmetry on meshes, you need to Apply Location, Rotation and Scale of the Armature to the Model so it gets symmetrized to the right position.
When it comes the bones, it does the same, but it does it only if the bone has a naming convention that ends with L or R (as far as I know.) The best part, is that if the bone is duplicated and its name is “REMOVE.L.002” (doesn’t end on .L), it doesn’t matter, Symmetrize ignores it and will make a symmetric copy of the bone. This function is very useful because that means I don’t need to go bone after bone to rename them properly so it precisely ends with .L, thus saving a lot of time.
So, after applying a simple Symmetrize, this is how the bones looked like.

Red surrounding Green
You may have notice that I put the red bones surrounding the green bones. As I mentioned, Green bones are part of the final Rig, while the Reds are not.
I think the best way to explain why I use them, is with some pictures. Let’s focus on the current setup:

We are going to focus on the Mouth. Now, if we were to apply these weights without the red bones, this is an approximation of how the weights would be distributed.

We are going to do the same, but this time with the Red Bones.

Thanks to the magic of Layers, we can have both of these approximations visible, so if we turn on the Visibility, we are going to notice something interesting.

While yes, the interaction will depend in which layer is on top of which one, it’s pretty clear we can see that while they interact in different areas, there are many areas that would share the same weight between those two. This is what happens when we use the Layer Mode “Difference” (and changed the color for a more visible result)

Now, we have 3 colors we should focus on:
- Red, which are the red bones.
- Green, which are the green bones.
- Yellow, which is where the weights interact between each other.
Now, merge those layers, change it to Color, clean a bit the parts that don’t matter to use (specifically, the cheek,) and let’s now check it.

This is the final point where I wanted to reach. Keep in mind, this is not accurate because I didn’t want to be accurate (not that I can though), I wanted to make a point across by using this example.
Notice how some parts of the mouth are green, others are Yellow, and others are Red. They represent exactly what we want: Green is the weight we want to be part of it. Yellow is a space shared, so a little part of it will be assigned to Green and a little part of it will be assigned to Red. Red is the weight that is not going to be part of that lip bone. It acts as a fence, like if it is saying No trespassing you bitch, so the red part will never have any influence near the Green weight.
Again, keep in mind, this is not accurate because I didn’t want to be accurate (not that I can though), I wanted to make a point across by using this example.
This is why I use so many red bones, I need to fence the weights a lot. This was specially hard with the ear bones, which is why I branched the main chain.
Adding the Weights
I’ve noticed that face rigging is also the process that has me doing Blender Python on-the-fly the most than any process I’ve done so far. If I do Face Rigging, fat chance I will write something in Blender Python.
In this case, I also did it. This time, I wanted to write a function that will add the weights of the bone to its parent (in this case, the ear branches Weights and the Eyelid chains will have their weights merged to their respective Root bone), and if they don’t have a Parent, they will be added to the Face Root Weight. I selected all the bones that were supposed to be removed (Red and the chains/branches.)

This function works… more or less. Like I mentioned in a post, I rarely put that much thought on Blender Python, for the most part, I focus to do something that just works. This function could be perfect if I were to also make it so it applies the Modifiers properly. I had to manually check it added the right weights though. In retrospective, that was a terrible waste of time lol

This is the weight of the Lower Eyelid. A little to much over the edges, but I'm fine with that.
So, the function worked pretty well, however, because I didn’t do proper bone relationships, I ran into a couple of issues, one of them being why the hell the bones didn’t add to the Right Lower Eyelid. I’m thankful this model has a perfect symmetrical head, so I only had to Mirror the Weight by its Topology, rename it and call it day.

So this is where I am sitting right now. This one went pretty smooth, smooth enough that the head is already flexed, so right now is time work on the figure, so stay tuned, and stay safe guys!
------------------------------------------------------------------------
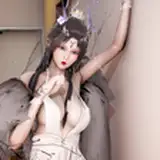
Also, completely unrelated, like literally, unrelated to anything in this post, but look at the legs of Master Raven’s in this win pose.

While she’s making a menacing movement with her sword, notice the pose: chest out, legs flexed and close to each other. The body pose makes no goddamn sense. The only reason for that pose is to showcase her thiccness. And I’m 100% ok with that.