
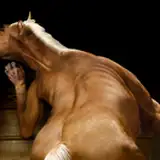
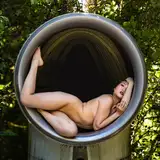
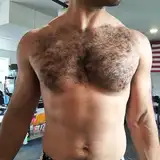
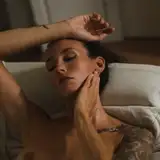
So, this is one really detailed project I'm working on, intending to make it a very beautiful transformation. In the final version, she'll be pawing at a stable door or something similar. There is much work to be done on it, but you can see a little bit of how I approach this here, and I can explain what I'll do from this stage onwards.
I do these in stages, and this is the completed first stage.
Stages:
1. General body form and shape
2. Manip the face by itself in a separate file (I go all Frankenstein and cut out noses, eyes, ears, jaws, cheeks and basically reassemble and blend the face back together)
3. Blending bigger human and animal parts smoothly (ignoring artifacting and stuff that I'll fix later), adjusting the color of the lighting in "hue saturation" to match the parts together. (this took me forever to get the hang of, experiment A LOT to learn how)
4. Detailing and small body parts (hands, ears, feet, tails, etc.)
5. Texturing (sweat, skin, hide, fur details)
6. Fixing lighting and shadows in the final composite of all the body, touch ups and minute details
7. Background, including shadows, etc., adding in shadows, obscuring objects, etc., blending the lighting of the tf with the background
8. Polishing things that strike me as inaccurate, adding in other effects to the lighting (like making it night or day), etc.
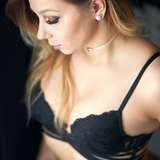
I employ different approaches to the tf itself depending upon whether the stock photo is clothed or naked, and depending upon how far along the transformation is. In this case, I want her anatomy to be obviously inhuman, so I start with the base anatomy from a horse. You can see of the pieces I've cut out: the waist, legs, neck, chest under the shirt and tail are all individual pieces. She's also mostly clothed, so I have to take out the pants and shirt separately and warp them to show the anatomy underneath.
Before I even got to this stage, though, I cut out her clothing into parts, her pants is one layer. Her shirt, however, is a layer for each arm, and two layers for the splitting sweater. I basically first took the big pieces and warped them into a general shape of a horse, using the Iwarp tool in GIMP. Then I cut out the shirt into two halves along the seam and warped in the edges where they come together to make it look like it's splitting.
I did a lot of stretching, warping and blending to get the shirt and clothes to have the right shape right, then I took out pieces from the horse photo and filled in the blank areas between the pieces of clothes.
If you're trying your hand at manipulation, the point I am at now could actually be made to look pretty good without a lot of work. You'd have to use a dodge/burn tool to make the lighting of the horse parts blend with the clothing. Burn does shadows and dodge does highlights. Getting this right can take a lot of experimentation, but basically you want to look at how the lighter parts of the clothing transition to dark and match that in the fur. You also want to create a transparent layer under the clothes but above the horse parts and draw in some dark shadows to show the clothes is touching the fur (otherwise it looks 2 dimensional like what I've got now).
You'd also have to blend her head and add some feet to the legs. How to blend her head into the body and such would make a whole tutorial by itself. But, in short, I layer over the two parts and then use the erase tool with a very low opacity so it takes out little gradual bits of the flesh. I also smudge the edges and such. I'm planning on doing a tutorial video on this in depth at some point because I think it is one of the most useful techniques to have.
Now, what I will end up doing with this to make it look super cool is use some stock of very sweaty and muscular flesh and overlap it with all the horse parts in above, taking this from a lot of different photos. Then I'll fade the opacity and use the eraser to pronounce some of the fur and human skin. To make them blend better, I'll use what are called darkness and lightness masks which extract the shadows and highlights of the human skin so I can overlap it on the fur. I make these masks myself by creating a greyscale layer of the human skin, playing with brightness/contrast until I can just see faint shadows and the rest is solid white. And then I "alpha" all the white areas so all that is left is a vague shadow. I'll go in highly zoomed in and draw in individual hairs sprouting to give it more texture.
I'll also add some hoof-like feet and and have her middle fingers swelling into hooves as well. I divide my photomanips into parts of the body and work on these individually. So I'd spend some time adding in a fleshy tail and blending it together with the horse tail, drawing in some addition hairs, etc. I might mess with drawing hairs in where her own hair connects to the main to show some transition there. I'm gonna have the pants splitting too, add in some threads coming apart in that and the shirt.
There are also a few neat little tricks I use, which you can see in the image. Do you notice that I have reversed the horse's legs with her's? The horse's left leg is now her right leg and visa versa. That is because you can see that in the stock photo, the horse's left leg is facing outwards toward the camera, while the left leg is parallel to the camera. These are opposite in the woman's stock photo. No one will notice if I reverse them, especially once I blend them with human flesh and the horse anatomy becomes less distinct.
I also have a transparent cutout of her original body underneath the transforming image because I am using this for size reference to convey growth. When I go to select background stock, I'll scale it to her original body-reference, which will convey visual cues to our eyes about how much her body has grown in size.
I think the most important pieces of advice I can give to people (and this actually applies to traditional and digital artists who draw their work as well):
1. Cut out everything from the photo you want to work with and use lot's of layers. Try to think about which parts are overlapping in the image.
2. Play with and change every part of the body. What makes it look like the anatomy is shifting is that no part of the body is untouched. That conveys a holistic sense of change. Leave nothing originally human unless it is one or two body parts you want to specifically emphasize for their origin.
3. Keep references of what the human started as and what they'll end up as in sight the whole time. This allows you to think of how things change between the two and find various midpoints depending on how far changed you want them.
4. Choose your stock very wisely. You can see from the two images I used that they have similar hair colors, similar body angles, and orientations, similar lighting (this is the BIGGEST THING...the color of the light on them). They are also fairly close in resolution (the stock of the woman was shrunken down to fit my work space).
5. Study the anatomy of the animal, their muscles, bones and such, and if possible, find analog comparisons which show how human body parts match up to animal body parts. Then, emphasize the differences of anatomy as much as possible to make it look like they are becoming inhuman. For example, I use this:
https://i.pinimg.com/originals/4f/f7/8c/4ff78c26464b59ef650e00c067cd8a39.jpg
6. Shape is most important first. You have to convey an overall sense of body change before you mess with things like tails, ears, and extremities.
7. Experiment! I taught myself all the tricks I'll end up demonstrating in later tutorials through fucking around a lot and creating things that look just downright bad. I play a lot with each tool and brainstorm how I could use it. I started out using only a few tools and gradually discovered new things to use.
I use GIMP, which is free to download here: https://www.gimp.org/. You can literally start messing around right now. I learned everything in it. Mainly I don't switch to Photoshop at this point because GIMP has become second nature. Another thing is GIMP has this thing called the IWarp tool, which is about the most powerful thing you can use for tf art, and Photoshop's liquefy tool is nothing in comparison. You'll find it under Filter/Distorts/IWarp in the menu.
But it doesn't work well unless you cut out the parts of the photo you want to mess with first. That is why the above image is actually 12 individual layers, one for each arm, each leg, pants, head, neck, two for the shirt, belly and chest (horse fur showing under shirt). I warped all of them individually and did a lot of back and forth, push and pull to match. It takes practice to get the amounts right, but always go for a larger brush for big changes of shape and a smaller brush to detail all the little things.
If you mess with the IWarp tool, my advice is try to do as little warping as possible to get it to the shape you need. The more you warp it, the more blurry the layer becomes. To compensate, I usually sharpen the layer immediately after warping it until it looks close to the original in terms of detail.
HumanimalZoo
2018-01-05 15:37:41 +0000 UTCPostalRoo
2018-01-05 07:34:57 +0000 UTCWilliam Bell
2018-01-04 21:56:09 +0000 UTCWhiteflameK
2018-01-04 07:07:47 +0000 UTCWilliam Bell
2018-01-04 05:22:29 +0000 UTCBen300
2018-01-01 13:01:47 +0000 UTCDarkCousin
2018-01-01 04:52:54 +0000 UTCIcaron
2018-01-01 04:25:02 +0000 UTCShade the Raven
2018-01-01 03:11:34 +0000 UTCWhiteflameK
2018-01-01 03:11:07 +0000 UTCShade the Raven
2018-01-01 02:36:39 +0000 UTC


