Welcome to the second lesson of the series! This week we'll be going pro at drawing legs. Legs are very similar to the arms when it comes down to the bones. Like the arm, there are 3 bones that comprise the leg. We have the femur, tibia, and fibula. Similar to the humerus, radius, and ulna. However, the fibula does not rotate around the tibia like how the radius does with the ulna, thus you don't rotate your feet from the knee. Instead, to change the angle of your foot, you rotate from the hip since your femur is attached to the pelvis by a ball and socket joint.
PART 1: DRAWING FROM REFERENCE

1: Like you see how I've done above, study the bones of the legs and feet. The pelvis can get tricky, so I suggest you simplify the shape before tackling it. Pay attention to the angles and don't rush through to finish as quickly as possible! Be precise and thoughtful. Remember the shapes and lines you produce. If you want to draw an angle multiple times, go ahead! It can be difficult remembering a form after only one go, so the more the merrier.

Don't forget to label the bones!
 the talus is labeled as "neck, body, and head"
The key to being a successful artist is patience. It takes copious amounts of time and energy to develop the skills necessary to be called a pro. You must love what you do. Be passionate about anatomy. Think of yourself as a med student at this point. Make sure you focus on what you're drawing because the next step will test you!
PART 2: DRAWING FROM MEMORY

Without any reference at this point, redraw the bones of the leg from the front, side, and back view. Label the:
pelvis
iliac spine
femur
great trochanter
lesser trochanter
patella
fibula
tibia
talus
navicular
calcaneus
cuboid
3 cuneiforms
metatarsals
phalanges
When you label the bones, you can keep track of what you may possibly be missing. It's a good habit to recite the bones as you draw them. If you are struggling to remember how the bones look like, don't worry! Go back and study some more and try this test again later. However, don't move onto the muscles yet if you haven't fully grasped the bones. One step at a time! Don't be in a rush.
PART 3: STUDYING THE MUSCLES

The legs can look very difficult to draw, but they're not! In fact, they are very similar to arms. You know how we have a bicep on our arm to help us curl; well we have biceps on our legs to help us bend or knees. We have triceps to help straighten and push our arm, and the quads do the same thing with our legs. Eerily enough, they look very similar if you think about it, albeit in opposite positions.

You will always find anatomical reference images that can look very different from one another. The one above is one of the best I've ever seen. Sometimes it can be difficult to distinguish the muscles from one another, but this image is very helpful at doing so.

There is a long band called the iliotibial band (iliac spine to the tibia) that acts as sort of as a rubber band. It's hard to see the quadricep muscles underneath, but that's what I'm here for.
2: By now you should have several pages of studies scattered around. Use my study sheets as a reference for what you should be doing. Don't leave any rock unturned. If you aren't sure about something, then revisit the source material. I am giving you only the best references, so all your questions should have an answer right here!
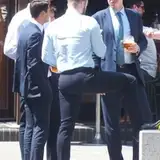
3: Let's have some fun! Draw the legs from these images. Keep in mind the muscles and how they move as the knee bends. As you bend your knee, the hamstrings (bicep femoris, semitendinosus, and semimembranosus) contract and bulge as the quads straighten out and get pulled. When the legs are extended, the quadriceps (vastus lateralis, vastus intermedius, vastus medialis, and rectus femoris) contract and bulge while the hamstrings straighten out as they relax. You get extra points for drawing the full figure! You know how to draw arms now too, so test yourself!
 Look for the sartotius strapping under vastus medialis. Note the gastrocnemius and soleus of her leading leg. Try your hardest to locate the muscles underneath the skin.

Look at the separation between the sartorius and the gracilis, adductor longus, pectineus, and iliopsoas. There's this dark line that separates them. Although it may be hard to see every individual muscle, certain muscles will stand out, and you should keep your eye out for them.
 See how the quads are stretched as the knee bends while the hamstrings are enlarged. Also, look at how the vastus lateralis sits atop the bicep femoris. That bulge at his hip is actually the tensor fasciae latae swooping over the vastus lateralis and rectus femoris.
PART 4: DRAWING LEGS FROM MEMORY

What you see above are quick drawings of the legs. That is what I always do after a study session. I draw what I recently studied without any images to help me out. I try to see how much I've been paying attention.
FINAL TEST
You're almost there. Now, like how you did with the skeleton of the legs, draw the muscles of the legs from the front, side, and back. If you aren't yet ready, go back and study some more!
Label these muscles and landmarks once you've finished drawing:
Iliac Spine
Gluteus Maximus and Medius
Tensor Fasciae Latae
Iliopsoas
Pectineus
Adductor Longus
Adductor Magnus
Gracilis
Sartorius
Vastus Medialis and Lateralis
Rectus Femoris
Semitendinosus
Semimembranosus
Bicep Femoris Longus and Brevis
Gastrocnemius
Soleus
Peroneus Longus and Brevis
Tibialis Anterior
Flexor Digitorum Longus
Extensor Digitorum Longus
Peroneus Tertius
And that's all!
HOMEWORK
You did a ton! But you're not done. See, you're gonna forget 90% of what you just learned unless you keep it up. Do these exercises again, 3 times a week, 1.5-3 hours each session, for 4 weeks. Ask yourself what you struggle with the most and work on that. Make sure you keep practicing arms too! Please join the discord if you haven't. If you have any questions, I'll be there. You can show me your assignments and I'll help you as much as I can.
Farewell for now! I'll see you soon!
Rotarr
2020-11-28 22:28:28 +0000 UTCAleksey Nisenboym
2020-11-01 17:02:26 +0000 UTCOmar Farouk
2020-10-30 22:26:29 +0000 UTC