INTRODUCTION
Crosshatching is a useful technique used to add depth and shadows to a form. Its mainly used in manga and comics but can be used for just about any illustration.

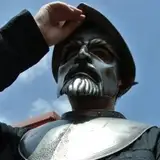
Takehiko Inoue, the artist behind the best selling manga 'Vagabond' specializes in using the crosshatching method. It's a useful technique especially in manga as there is not going to be any colour over top, thus it highly benefits an artist to gain experience cross hatching so that their work doesn't come off looking flat and 2 dimensional.
HOW TO USE HATCHING

STEP 0: For this exercise I use 0.05mm fine-liners. My preferred choice is the Sakura Pigma Micron 005 as it's ink is slightly darker than the Staedtler's Pigment Liner 0.05. However the Micron takes much longer to dry, so Copic markers will smudge it if you rush into shading unlike the Staedtler. However the Staedtler is prone to fading as you erase over it which is an issue if you plan to use pencil guidelines underneath. I mainly draw on 90lb or 140lb cold pressed watercolour paper because the texture gives my lines a more scratchy look, which for me is a plus as it lets me control the weight of the lines better. When the paper is too thin, too much ink is absorbed causing the lines to fatten up and lose their sharp features. Here is a wonderful guide to what pen is right for you.
https://www.jetpens.com/blog/the-best-fineliner-pens/pt/423

STEP 1: The first step is the draw out a form. In the example I will be using a male head. You can draw out an entire character if you wish, but for the sake of quick learning, it's best to start off with something smaller as you'll have to redraw the subject several times for this exercise.

STEP 2: Adding contour lines lets you see the object as if it was a 3-dimensional thing. Make sure you visualize the lines as they swoop down the brow ridge, then ride down the nose and fall under it to the lips, and then finally curve below the chin and onto the neck. Keep your lines flowing in one direction. As you can see in the vagabond example, although he isn't hatching in a downward direction like me, he's chosen to go side to side, but all the hatching on the face follows that exact same path. Otherwise the lines will cross, darkening some areas which will pop off the page too much and grab unwanted attention

STEP 3: Determine where the light is and where the shadows will be cast. If you have trouble figuring this out from imagination, I recommend pulling up some reference images from Google to help you out.

STEP 4: Basically like how the masking tool works in photoshop, I covered the areas in red from step 3 with the contour lines from step 2. Areas that I want darkened, such as under the neck will be layered with an extra series of hatches. But the face which doesn't have areas that are too dark only has one layer of hatching, which all travel in the same downward direction.
WHERE TO BEGIN


A very simple practice is using two spheres, one on top of the other. Similar to using the red to shade in the face from the exercise prior, I want you to use simple small hatched lines to outline where the shadow and the light separate from one another. This is the terminator line and it will let you know where to shade in the next step.

Moving in one direction only, hatch in the space that you designated as your shadows. You should notice that the image is starting to take shape and look 3-dimensional fairly quickly. You should also notice that your terminator line is darker than the shaded area.

Now to darken the shaded area some more, we will cross hatch. The further the lines are from each other, the brighter the area will seem. Where the ball comes into contact with the floor, I place the lines closer and closer to each other until its pretty much black.

I have a rule I follow for my work. I personally prefer when the first layer of hatches and the second layer of hatches don't angle too far from another. I don't like to see the lines compete with one another too much. However, I will angle them pretty randomly when I'm creating a very dark space, such as contact shadow.

In this example, I use every method I stated earlier. You can create a crazy amount of depth and structure with as little as three layers of cross hatching.
WHAT TO DO?
Well now you should have a better understanding of how to cross hatch. It's very different than painting or shading with pencil. You only ever have one colour to use and that's black. So it is up to you and that one colour to give the impression that you're using other shades of grey, when in fact it's just about how spaced out your lines are. The best thing to improve on your hatching skills is to begin using it. If you want to go over the previous anatomy lessons and draw the examples I gave out as links using a pen, then by all means go for it. If you ever wanted to create your own comic, you might find that cross hatching is the way you want to go, because for me, nothing feels better than crossing some lines on a page.
Jo.dann
2020-01-18 01:42:51 +0000 UTC