I've been doing some YCH animations inbetween illustration commissions and I figure I can break down that process a lil!
I'll focus on the process of establishing the motion, and tying down linework & detail for a walk-cycle like this-
Some general info - this animation has 14 individual frames, that play for a total of 36 frames at 24 fps / 7 of those images last for 3 frames each, and 7 images last 2 frames each. The rhyme or reason as to which frame I picked to last a tick longer is all just based on vibe lmao - I animate using TVPaint and studied animation for 2 years in Luxembourg!
----
Prep Phase:
Starts by simply figuring out the angle and general proportions I'd like to go for, sometimes I get a lil guide sketch for the overall mass of the body shape - othertimes I just go straight into it and draw one of the keyposes out and make sure that looks good and appealing and proceed from there, using that frame as my body-mass reference, and figure out what motion I want with much looser sketchwork
Sketch Phase:
Once I got one or two key poses down and a vague idea of the motion / how I'd like the timing to look, I split the process of a clean-up sketch phase into separate layers / separate "passes". Here I first focused on the biggest visual drive of the motion, the front legs. And to backtrack a little, here's my thinking on what key poses I chose to give myself a good guide for the rest of the cycle:
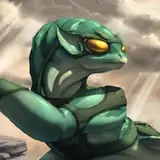
The perspective is quite pushed so I needed to make sure that I establish the "max" size of those front paws when they're closest to us, the viewer, and I knew those would be visually striking poses since they establish the gait - by basically being the pose at which the paws are furthest apart. Plus it'd be the pose where the weight shifts during the walk, so it signifies a change of tilt at the torso-level.
From there it's a mix of straight-ahead animation and pose-to-pose animation. The other key pose I need to mark is the one where the legs "pass" each other, one leg would be perpendicular to the ground, and the other passes to the front - it marks the point where the torso would be lifted highest off the ground. (the pose with the paws furthest apart is where the torso would dip lowest )
Where I benefit from straight-ahead frame animation, is at the point of contact - the paws tilt forward, start to make contact with the ground, the weight settles on the paw, the other one starts to lift, the body tilts fully, the wrists change angle to accomodate- etc.
And for either method, I need to make sure the legs have the right/left variant of the pose at a similar point of time, and with the right adjustments to uphold the perspective I've established - If I was less certain about how to visualize these shapes in these angles (basically mentally tilting cylinders in a 3D space ) I'd need to put down a lot more perspective grids and guide points to keep track of the size changes during this motion.
The second pass/ second layer are the hind legs, which follow pretty much the same logic - but I don't worry too much about the relation to the front legs just yet, I just focus on animating the loop for them.
Once they're done I start to see if I need to correct the timing of the loop, after all, walk cycles can be tricky in terms of the order of the footfall - I needed to make sure the loops coincide in a way where whenever a paw lifts, the other 3 are well grounded
Third pass/ third layer - the head is tricky, I wanted to add some flair on top of the general bobbing that results from the up and down motion of the walk, so I focused on establishing a type of swaying. And I always overestimate how much distance you need to cross for subtle changes to be readable, I had to tone down the swaying and bobbing quite a bit to make it look less erratic. Keeping layers separate means it's an easy process to shift the sketch work and adjust quickly without having to redraw and erase constantly across multiple frames!
I ended up figuring that while I can keep the sway subtle, adding a little head tilting during the sway adds some interest to the motion.
---
Lineart phase
For lineart, I segment the animation into even more "passes", since I'm already fairly happy with the overall motion and feel of the sketch, I know I'll have minimal risk by simply focusing on one part at a time.
Either way, the cleaner your sketchphase is, the more precise your lineart will be, but I also gotta make sure I'm efficient! So I rely a lot on improvising and using previous frames as my guide, rather than sketching out the exact guiding shapes for each new frame.
For example, if I line the left front paw in nice detail, on the next frame, I simply shift the same details by a tick, resize the paw in its entirety, maybe scoot some toes further apart to adjust for the change in rotation.
And that method becomes real important for fur - I've free-handed fur animation a little here and there, but it just becomes a flickery-erratic mess if I'm not extermely precise, so it's just easier to draw out maybe 3 key poses, and just tweak, rotate, squish, stretch those details across multiple poses to make sure the detailing is consistent.
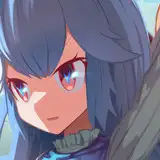
That method is used for the face as well! The face changes the angle throughout this 14 frame animation, but I've only redrawn the face 2-3 times at most. Shifting the snout detail, scooting one eye closer to the edge of the cheek, letting the fur drag behind and bounce with the sway, that's all tweaked individually across the 14 frames. It keeps details consistent!
---
I won't go too much into the coloring and shading since the gist is pretty much the same idea, keeping track of detailing across frames, shifting them according to the change in angle, keeping shapes and lines consistently spaced apart - the application and method of execution here is much more program specific, and I myself am still learning the ins and outs in that regard!


![Jive Faury [SDD Lab]](https://nokimo.com/istorage/43236.jpg)