

A Hunter Must Hunt
If you've been here a while, you'll know that I fell head-over-heels in love with the Soulsborne games in early 2018. After playing Bloodborne, I made it my mission to cosplay one of the coolest NPC characters in video games. Almost a year later I did it. Go me.
I had sat on this one for so long, because it was really different from any other cosplay I created before. I had never made anything remotely 'spooky' in my entire cosplay life, so something like this was really outside my comfort zone. I remember making the sword, boot covers and a base for the mask when I started a year ago. I scrapped those versions this time around and re-did them.
I do regret not being able to make the pistol. I plan to make one when I have my 3D printer.
Hold on to your blood vials and roll button cuz this is gonna be a long one.
Materials
Boots and Boot Covers
I had a pair of heeled chelsea boots hanging around that I had broken in. They were naturally weathered. I just decided to use those. They are also comfy as heck.
Eileen doesn't have a heel, but I am a small human so I opted for one. Eileen is also a classy old lady so I'm sure she might wear them anyways.
The boot covers were made originally from neoprene... which is nice and stiff with a bit of stretch... But it doesn't weather nicely.
I remade them with a soft textured black pleather. They slip on and tie around the knee area. An elastic keeps them on my boots. I hand sewed 12 buttons on each cover.
Pants
I have some nice vegan pleather leggings I got a long time ago. I wear them in day-to-day life, and thought they would match with the cosplay.
Jacket
I used a military jacket pattern. All I had to do was lengthen it, add a big collar and shorten the sleeves. I chose a wool blend for the jacket. It shredded nicely, and was super easy to work with. I glued the button panels on, and added a zipper. The lining is just a basic grey lining.
I made basic paper patterns for the cuffs and collar. I cut them out with my good fabric and sandwiched some stiff interfacing to make them stand up.

Gloves
I made some simple gloves from off-white pleather and stretch fabric. I sliced lines in the top of the gloves, and stitched them back up with white embroidery floss. The wraps are sewn on at the wrist area and tied up in however way you feel.
I had a few holes in the gloves where they were too tight, so I ended up just hand stitching them shut. It works for this character, because the whole costume has this worn look to it.
Belts, Straps and Necklace
I glued two lengths of brown pleather together and cut into strips. I sewed the strips for extra security and details. These strips made all the belts and straps. I used an eyelet punch to make the belt holes.
I made the necklace from a small bell ornament I had hanging around. I had to sand off all the gold paint before re-painting it silver. It just attaches with a small silver chain and a safety pin.
Pouch, Bottles and Surgical Kit
I made the pouch with brown leather and 5 mm craft foam. Its all glued together with contact cement. The foam keeps the pouches shape. The loops and details were stitched on as well. The pouch closes with velcro.
The bottles were made nasty with black paint and filled with resin. I made the labels with regular shipping labels and painted them with watered down acrylic paint. They just peel and stick on. They attach to the belt with some more of those pleather straps.
The surgical kit is probably my favorite detail in this costume. It's a pity the cape hides it so much. I weathered a bunch of manicure kits and filled some vials and oral syringes with red resin. The whole thing has loops for the belt to go through. The pieces are glued and strapped in.


Hood and Hat
Both the hood and hat are made with pleather. For the hood, I used a simple medieval pattern. It just slips over my head. It also serves to hide my hair and make the hat sit on my head better.
The hat was made using a hat as a template. I also interfaced the brim so it wasn't as floppy. The interfacing is hidden with a simple broadcloth lining.
Remember to make the hat big enough to sit over your hood and mask.
Crow Cape
The big boi.
This part of the costume is very heavy. A friend of mine hand sewed parts of his because he was worried his machine would not be able to sew it. use good, thick pleather for this part of the costume.
This was probably the second most daunting thing for me to make, after the mask.
The 'poncho' part is simply a 1/2 circle skirt cut to match. I had originally done two 1/4 skirts and sewed them together. Both work. I also made a lining part so I could hide the tops of the 'feathers'. The lining is a black suiting fabric. I also recommend adding velcro to the back of the cape and coat, just for extra security.
The 'feathers' of the cape are really just strips of fabric cut into feather-ish shapes. I used 4 different fabric types: Suiting wool, gauze, textured pleather and non-textured pleather. I cut out a bunch of different lengths and layered them so the longest would be on the bottom and the shortest would be on the top.
I sewed all the lengths together so there was a left and a right 'wing'. These were then sewn on the poncho part between the top and the lining. I used my machine to sew them, but it took a long time. Then I went and shredded the cape further with an craft knife.
The cape is heavy, so I had to add some lacing to the front to keep the cape on.

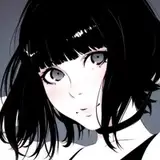
Mask
It took me forever to find a basic mask pattern. Here is the one I used. I made a paper template, tested the fit and modified it. Then I made a base out of 5 mm craft foam. I then sculpted the details on with foam clay. Once the foam cures, I sealed it with wood glue and modge-podge before painting. The stitching details are done with embroidery floss.
I also added some d-rings to hold the straps that secure it to my head. The straps are made the same way as all the other belt strips.
Blade of Mercy
Here is the template I used. I made the base from foam board, shaped it with an exacto knife and glued the magnets in the appropriate areas.
I then covered them with worbla, primed them with wood glue and painted them. I had actually re-done the paint job as one of the last things to complete the cosplay.
The magnets aren't as strong because there is worbla between them. If I were to re-do them, I'd 3D print so the magnets would work better.
Weathering
I chose to talk about this in its own section. I used a box cutter, sanding block and a metal bristle brush to physically tatter the costume. The bottom of the jacket, all the feathers on the cape, the bottoms of the boots, etc. Where ever the costume would see the most wear and tear.
The dust/gunk/blood is just acrylic paint. I water it down and brush it wherever I think it needs it. Just make sure you use leather paint on the appropriate parts. Regular acrylic paint will just peel off otherwise.
Photo Credits
LVP: https://www.instagram.com/lucidvphotography/


