Float +Vace native - Talking Avatar - Version 20250523
Added 2025-05-23 14:07:49 +0000 UTC
Video Tutorial : https://www.patreon.com/posts/129688882/
Step-by-Step Workflow in ComfyUI
Step 1: Setting Up ComfyUI
Before diving into the workflow, ensure you have ComfyUI installed and running. If you’re new to ComfyUI, follow these steps:
Install Python and set up a virtual environment (e.g., using Conda).
Clone the ComfyUI repository from GitHub.
Install the required dependencies using pip install -r requirements.txt.
Step 2: Installing the Float Custom Node
Open your terminal or command prompt.
Navigate to the custom_nodes folder in your ComfyUI directory.
Run the following command to clone the Float custom node repository.
Step 3: Preparing Your Inputs
To generate a talking avatar, you’ll need:
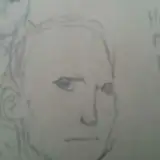
A close-up portrait image : Ensure the face is clearly visible.
An audio file : This will drive the lip-syncing and facial expressions.
Step 4: Configuring Float
In ComfyUI, locate the Float custom nodes.
Use the Load Flow Models node to import the necessary Float models. The custom node will automatically download the models if they aren’t already present.
Set the following parameters:
FPS (Frames Per Second) : Typically set to 25 for smooth animations.
Emotions : Choose from options like happy, sad, angry, or neutral to match the tone of your audio.
Seed Number : Use a fixed seed for consistent results or randomize for variety.
CFG Scale : Adjust this value to control the intensity of facial expressions.
Connect your input image and audio files to the Float node.
Step 5: Generating the Video
Use the Video Combine node to assemble the frames generated by Float.
Set the output format to MP4 for compatibility.
Run the workflow and wait for the video to render. Float can generate videos up to 10 seconds or longer, depending on your hardware.
Step 6: Extending the Avatar with WAN 2.1 VACE
Once you have a close-up talking avatar from Float, it’s time to enhance it with WAN 2.1 VACE.
Outpainting Setup :
Use WAN 2.1 VACE to extend the background or add body movements.
Adjust the padded area to fit smartphone or landscape dimensions.
Batch Processing :
Split your video into smaller batches (e.g., 81 frames per batch) to avoid memory overload.
Trim the audio file accordingly for each batch.
Model Selection :
Use models like VACE 14B for high-quality outpainting.
Enable multi-GPU support if you have limited VRAM but sufficient RAM.
Final Rendering :
Combine the processed batches into a single video.
Preview the result to ensure smooth transitions and natural movements.