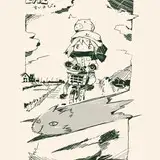
This is Part 2 of my full process for Breeze, a painting I made in 2022! Check out the feed to see Part 1.
Here’s some information about this process video:
It has been sped up by 250%, so 2.5 times the original speed.
This painting session took me about 6 and a half hours, split up into multiple sessions.
I split the full process into three parts. This is part two of three!
I mostly used the hard round brush from my own brush set to paint this, as well as the lasso tool & gradient combination. To learn more about that, check out my step-by-step resource on painting with the lasso tool.
This is painted in Adobe Photoshop. If you want to replicate a similar workflow in Procreate, use a soft/blendy brush instead of the gradient. There’s more about how to do that in my tutorial video on creating soft and hard edges with the lasso tool!
Here are some helpful resources that can help understand this process in more detail:
Painting clouds: This video talks you through how I paint clouds, and especially how important is is to vary the shapes that you’re using to create more visual appeal.
Creating interesting & flowy shapes: This tutorial talks about how you can approach shapes in a way that is expressive and dynamic. Shape language plays a huge role in this study, so this tutorial can give some insight into the ideas behind them!
Soft & hard edges with the lasso tool: This is a technique I use a lot for this process, and this tutorial runs you through it and also provides a short demo for how you can mimic the same effect in Procreate.
ONE AREA AT A TIME
The focus of this painting are the clouds. They’re front and center, and really need to work in order for the rest of the painting to make sense. It’s all about how they rise over the figures like a mountain range, and also are reflected in the bottom part of the painting. That’s why the first half of my painting process was purely aimed at getting the clouds right before focusing on anything else. I basically render the clouds to completion before thinking about the other elements. In general, my painting workflow is like this: I think about the image as a whole in the early thumbnail stage, but after that, I focus on getting one thing “right” before moving on. I feel like it’s important to get one thing to work before thinking about the other stuff - that makes it easier to make creative decisions that support the main element, rather than distract from it!
SILHOUETTES
At 28 minutes in, I start working on the figures. This is easier said than done! The figures are tiny silhouettes in active poses, which seems like it would be easy to draw them, but it’s so hard to get a sense of believability without breaking the sense of reality. The more detail I add to these figures, the worse they look from a distance. But if I keep them too simple, they look cartoonish. I try a bunch of different poses but it takes a while for me to land on something that works. For me, this is all about simplifying and playing around with the proportions. I just experiment with it until it somehow looks good. This involves zooming out often, and not being afraid to stretch and skew the proportions beyond realism purely to make them more readable. The whole second half of this video is me trying to make this work and not quite getting there - but I finally land on something in part 3 (which is coming right up)!