Here’s the full process of my Glare painting from last month! I split it into three parts, and this is the final of those three. You can find the previous two parts in the feed!
 Here’s some information about this video:
This second process video has been sped up by 350%, so 3.5 times the original speed.
This painting session took me 10 hours in total.
I mostly used the hard round brush from my own brush set to paint this.
This is painted in Adobe Photoshop, but the same workflow can be applied to most digital painting software!
 Here are some helpful resources that can help understand this process in more detail:
Creating a strong composition: This tutorial talks about how I arrange different elements to create a sense of visual flow in the image. This played a huge role in making my creative decisions for this painting!
Creating emotive art: This video talks about how I use various decorative elements and visual styles to put the focus on mood and emotion in my artwork.

THE MOST TEDIOUS STAGE
This video represents the final stage of my painting process: polishing and finalizing the detail. It’s also by far the most tedious stage! I usually feel like the painting is so close to being done, but it ends up taking hours and hours because I keep running into new areas that need to be refined and polished. It’s a very methodical part of the process that involves moving from area to area, layer by layer, with the pure goal of cleaning everything up. I wrote a newsletter about this part of the proess that included a few helpful tips on how to maintain focus during this stage. You can find it here!
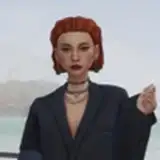
THE PROBLEM AREA
There’s always an area of my painting that really bothers me but I have trouble fixing. I end up dedicating a lot of time to solving the issue, and it really slows down my overall process! In the case of this painting, it’s the lock of hair on the left side of the character’s face, which slightly covers her eye. I just can’t figure out how much detail to add to it: the more I push the detail, the heavier and more distracting it feels. But the less detail I add, the more it just fades away and creates a blank / empty area in the painting. I spend a lot of time fighting with it during this video - especially around the 26:27 mark - and honestly, by the end I just kind of give up and let it go. It’s a reminder that there’s always some random area in a painting that bothers me and takes forever to fix. It’s just part of the process!
CHECKING MY PROCESS
My general rule of thumb when it comes to finalizing my artwork is to make sure that whatever I’m doing is improving the painting, or at the very least not making it worse. That’s why it’s important for me to keep an older version of my painting on hand so I can compare before/after adding detail. That’s something that happens 47:08 minutes in: I spend some time detailing a branch behind the character, but then look at an older version of the painting and see that the branch looked better before. So I copy/paste the older version back and start again. It always feels like a waste of the work I put in, but it’s just really important to make sure that the painting is actually getting better during this final painting stage! I talk more about this in my tutorial on finalizing a painting without over-rendering.
I hope you enjoyed this process, and as always, feel free to let me know if you have any questions! ❤


![gal ha had[The Sir]](https://nokimo.com/istorage/53465.jpg)