HereŌĆÖs part 2 of the process video for an older painting I did back in 2021! The first part was posted a few minutes before this one.
HereŌĆÖs some information about this process video:
The process has been sped up by 300%, so 3 times the original speed.
This painting session took me about 6.5 hours in total. This video shows the final 3 hours or so of the process.
I used a mixture of the lasso tool and my hard round brush to paint.
This is painted in Adobe Photoshop, but the same workflow can be applied to most digital painting software.
Here are some helpful resources that can help understand this process in more detail:
Using the lasso tool to paint: This is a step-by-step resource that explains in more detail how I combine the lasso tool with gradients, brushes and flood fill to render and add detail.
Simple tricks for urban speedpainting: This tutorial runs you through how you can gradually build up an urban setting in your paintings.
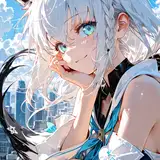
COLOR STRUGGLE
At the beginning of this video, I start adding more and more color to this painting. I decide to add more reds, purples, and rust tones to it. Sometimes this technique of slowly adding more colors works quite well, but for this painting, I felt like it was taking me further and further away from my initial idea. I was starting to miss the cooler colors and a more monochromatic color scheme that I had originally created. So at 22:25 minutes in, I decide I donŌĆÖt like this version and I go a few steps back and start again from there, this time staying more true to my initial colors. I feel like itŌĆÖs really important to take a step back and start over if you need to. It feels frustrating to do at first, but it creates better end results!
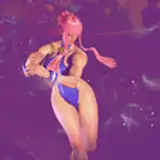
TEXTURE OVERLAYS
Since this painting features a high-detailed industrial setting, I want the details to be complex and gritty. Towards the end of the painting process, I add some texture overlays to achieve this. ThatŌĆÖs basically where I take a photo and play around with the layer modes to blend it into the painting - modes like screen and overlay give the best results. I start doing this about 51 minutes in, where I use a picture of dust on the ground to add some dust clouds underneath the character. I also use a lot of textures to give the sense of the light beam catching particles floating in the air. I feel like these kinds of finishing touches work best on a good foundation, so I try to establish as much as I can without textures and then use overlays for that final touch of added detail. In this case, I got my texture images from textures.com.
I hope you enjoyed these process videos! As always, let me know if you have any questions about it!