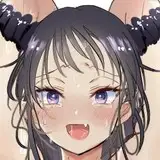
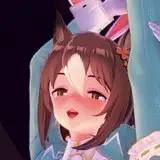
Here’s the process video for my Hibiscus painting! This is a remake of an older work:

Here’s some more information about this video:
The process has been sped up by 300% - so 3 times the original speed.
This painting took me about 3 hours and 15 minutes to make in total.
I used the Macalabs HB Pencil brush to sketch and the hard round brush from my own brush set to paint.
COLOR EVOLUTION
One of the main things that is interesting about this process video is that the colors change and evolve gradually to become more and more vibrant and saturated. The reason for this is because I start with colors that are in a similar range to the original - red combined with neutral brownish tones. These colors are all in a really similar range. But then about 11 minutes in, I feel like the color scheme is just too brown and bland. I really want the red to glow and stand out because it’s such an important part of the painting and it draws attention to the girl’s eyes. So I start looking for a good secondary color to balance out with the warmer tones, and I paint a soft blue tone on an overlay layer. Once I do this, the neutral background tones start to feel more expressive, and the red feels even brighter and fresher. This is something I gradually push throughout the whole process by modifying the colors and continuing to add blue and purple hues to the background. Eventually, around 33 minutes in, I start blending more blues and purples into the figure as well, so that foreground and background feel more unified. This is how a color scheme can evolve naturally and intuitively depending on what you think is most helpful at that specific moment! Once you find something that works, don’t be afraid to lean into it.
ELEVATING THE DETAILS
I had originally planned to spend a little less time on this painting. I considered it finished at 53 minutes into this video. But when I opened it again the next day, I felt like it was missing a kind of visual pop - it felt a little bit underworked, especially considering that it is a remake of one of my more detailed paintings. So I started elevating the painting by adding more detail and complexity, especially around her face. I add more highlights to her hair, refine her facial features more, and also brighten some areas of the painting a bit for some more contrast. Finally, I add some purplish highlights for some more 3-dimensionality around 59:50 minutes in. This part of the process is always difficult, because it’s totally subjective whether a painting is finished or not. The degree of detail and finish needed to make a painting look finished also depends entirely on your own style. Having time limits helps me to avoid over-blending and getting lost in the details, but sometimes I find that some extra time is needed after all. The main thing I can advise when determining whether a painting needs more work is to take a break and look at it a few hours or a day later. Usually it’s a lot clearer to see when you have fresh eyes!
Hope you enjoyed this process video! I definitely recommend checking out my tutorial on finalizing a painting without over-rendering for more info on my rendering process for images like this. As always, let me know if you have any questions!
Loish
2024-06-17 15:19:29 +0000 UTCLoish
2024-06-17 15:19:02 +0000 UTCLauren Nicole
2024-06-14 19:06:00 +0000 UTCbolenho
2024-06-14 13:40:33 +0000 UTC