PROCESS VIDEO // ariel
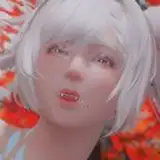
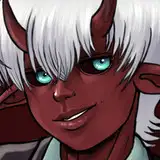
Added 2022-06-01 09:00:06 +0000 UTCHere’s the process for my Ariel painting from last month! It’s sped up a little under twice the original speed. The process took me about 1 hour and 40 minutes in real time. I made some final adjustments to this image after recording this process video, so there are some slight differences in the face and colors for the final version, but this video shows 99% of the process!
I figured this would be an interesting one to share because it started as a pencil sketch in my sketchbook, which I then scanned into the computer and turned into a digitally painted piece. (If you want to know more about my sketching process, check out last month’s tutorial here!) I ended up painting over quite a lot of things and slowly changing the face and hair in the process, and as a result I feel like the digital version is very different from the sketch version - they became two pieces on their own.
At the beginning of this process video, I use a specific technique to turn the lines into a transparent line layer. I’ll be uploading a little demo on how I did that in a minute, since I figure just watching along will not be clear enough for those who aren’t familiar with the technique!
Some other things to keep in mind while watching this process video:
- I copy/pasted the background from a different sketch session that I did last year. My objective with adding a background like this is to add some depth and a painterly look to the image, without painting an entire background. I create it basically by painting random colors onto a solid base, and using the lasso tool to edit and boost the hues in various areas. As long as it adds some texture and vibrance, anything works fine!
- You can see that I use the lasso tool a lot to choose the highlight and shadow colors. The reason why I like using the lasso and color modification tools is because it allows me to modify the base color, rather than picking a totally new one. So if I select a chunk of her green fin, for example, and use color balance to push it towards a brighter yellow, it is automatically more unified and blended with the base color - because it’s modified from the base color. It’s also really efficient and fast, which is why I like choosing colors this way!
- At 23:20 minutes in, I decide that I don’t like her face anymore. I make a new layer and paint over it, and then start re-doing the face from there. This usually happens when the face has way too much texture and noise on it, which makes it difficult to read the expression and see the features clearly. That’s why it helps to just paint over the whole thing and start blocking in the features again with a darker color - this lowers the chaotic level of detail on the face, and makes everything more readable. I use this technique to redo the face quite often when I paint!
Hope you enjoy the video and keep an eye out for the demo that is coming up in a minute!
Comments
Lush to watch - and thanks for the descriptions underneath, it's helpful to see the reasons why you did certain things! Very educational heh.
andy_illustrates
2022-06-05 12:27:16 +0000 UTCLoish.... ¡es la Ariel más bonita, que he visto nunca 💛😍! Tu estilo es siempre reconocible y espectacular... Y la evolución de este personaje, muy interesante.
Dánae
2022-06-02 14:20:48 +0000 UTCI'm so excited about this since I find your color choices so magical in this piece! Thank you for the video♡
mgm
2022-06-01 09:07:22 +0000 UTC