PROCESS VIDEO // ruffle - part 1
Added 2020-03-24 13:52:38 +0000 UTC
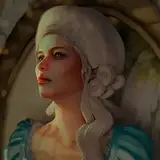
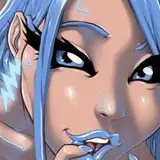
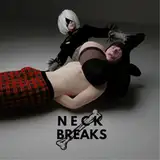
Here's part 1 of the process for Ruffle! The painting took me about 11 hours in total to make, and this video covers the first half of that process. This video is sped up by 6 times (a bit slower than part 2, so you can get a clearer look at how I set up this painting). In general, for my painting process, I put most of my creative energy into the first hour or so. During this time, I try to build up the composition and colors so that the rest of the process is mostly just finalizing and detailing. I want to limit the creative decisions to the early part of the process, so that the rest of the process can be as relaxing and straightfoward as possible.
Some things to keep in mind while watching this video:
FIRST SKETCH
I like to keep the first sketch very simple. I don’t work out too many of the details, because I can always do that at a later point. I want my first sketch to be as dynamic as possible and have lots of movement so that’s what I focus on instead. You can see that my sketch has simple shapes for the hands and feet, and just dots / lines for the facial features. The brush I use for my first sketch is the Macalabs HB pencil brush which I reference in this post: https://www.patreon.com/posts/step-by-step-i-34615265
USING NON-BRUSH TOOLS TO PAINT
Even though it’s a digital painting, I use tools other than the brush to ‘paint.’ These tools are great for creating a soft effect, which can be harder to achieve with brush strokes.
- Gradient tool: I use the radial gradient tool (just select the gradient tool and click on the circular shape in the menu at the top) and set the colors to ‘foreground to transparent’ in that same menu. I also have a lower opacity - around 50%. This way, I can easily add soft, circular gradients to layer colors onto the image. I start doing this at 1:45 minutes, when I start layering skin tones on top of the darker background color.
- Feathered lasso: This is basically the lasso tool, but then feathered so that it makes a softer selection. In the case of this image, the feather value is set anywhere from 100 to 200 pixels - the amount of feather depends entirely on how large your image is and how soft you want the selection to be. It’s a question of trial and error to find the right amount. I use it to select specific areas and then modify the colors in that area - for example to make the reds ‘pop’ a bit more with color balance. You can see me doing this at 2:25 minutes.
- Lasso + gradient: Another technique I used to paint was to make selections with the lasso tool (this time without feather, so just a hard selection) and then use the radial gradient tool in that specific area only. This is a great way to add soft highlights and shadows. The best example of this starts around 18:40 minutes, where I use this technique for a while as I gradually add detail to the ribbons. It’s basically: first you make a selection, then use the gradient. It works well for drop shadows, bright edges, and highlights. I alternate between this technique and the brush tool to bring more definition to the painting.
KEEPING AN EYE ON THE EARLY VERSION
As I add more detail, I sometimes stray further away from the rough version. Sometimes this is ok, but sometimes the painting seems to get worse - I lose the dynamic feel or the softness of the original. So for this painting, I added more detail on separate layers so that I could turn the visibility on/off to compare it with the earlier version. This is basically a way of checking whether the image is still on the right track. You can see me doing this at 28 minutes in. 15 seconds later, I also have an older version of the painting open to keep as reference, so I can compare the paintings side by side. This is just to make sure that I don’t lose the aspects of the painting that I like the most.
Hope you enjoy this video! Part 2 is coming up this week!
yes, you can create a feathered selection in Procreate! you should be able to use a 'feather' slider in the selection options at the bottom of the screen.
Loish
2024-11-18 13:00:55 +0000 UTC
Can the feathering technique be accomplished in Procreate?
Michael Devers
2024-11-16 21:16:30 +0000 UTC
Hei Loish. I was wondering if you did use reference for the cloth-part? very cool painting
Luca Egger
2020-12-30 15:19:25 +0000 UTC
Because for me it's hard at the moment to draw something like this from imagination.
Luca Egger
2020-12-30 15:16:58 +0000 UTC
Hei Loish! Like your work and your tutorials.. Did you use reference for the cloth - part?
Luca Egger
2020-12-30 15:15:44 +0000 UTC
Thank you! :)
Zandria Goldsack
2020-09-07 10:50:53 +0000 UTC
hey zandria! thank you! I basically use a mix of lasso & gradient to gradually layer on the shading. you can find more info about it here: https://www.patreon.com/posts/step-by-step-36570445 the second step shows specifically how I do that :)
Loish
2020-09-07 10:49:31 +0000 UTC
Love! Can I ask how you painted with the gradient tool?
Zandria Goldsack
2020-09-05 01:54:39 +0000 UTC
What size did you scale to?
2020-03-26 19:12:32 +0000 UTC
Beautiful Work have you thought about adding music?
Roy Elliott
2020-03-26 15:43:59 +0000 UTC
that was to upscale it to make it as large as possible :') technically I should start out at a large size, but sometimes I find out during the process that the size is too small. so I upscale it before adding detail.
Loish
2020-03-26 12:05:47 +0000 UTC
Thank you so much for sharing the process of this beautiful painting with us! The early stages made me think of the Mistborn books by Brandon Sanderson, my favorite books <3
Juliane
2020-03-26 10:01:58 +0000 UTC
This is literally my favorite piece so far, it's so inspiring!!!!...Btw, i have a question: before you started with the hard brush (when you choose one of the layer you will work with) you changed the "image size", Why is that for?
Bastian Esteban Cruzat Cortes
2020-03-25 23:23:38 +0000 UTC
thanks so much :)
Loish
2020-03-25 13:52:58 +0000 UTC
thank you! i have no idea whether photoshop brushes can be imported into krita, but i use very simple brushes so you should definitely be able to mimic the process for this painting in krita if you wanted to.
Loish
2020-03-25 13:52:44 +0000 UTC
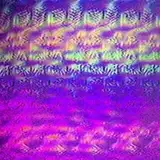
it's inspired by the art of huang xu, a photographer who made photographs of plastic against a dark background. super beautiful and inspiring!
Loish
2020-03-25 13:51:53 +0000 UTC
What was your inspiration for this piece? I really enjoy your more illustrative works!
trowelandspade
2020-03-25 10:25:46 +0000 UTC
these are getting me through the quarantining, thank you
flanne
2020-03-24 21:27:06 +0000 UTC
Why you have to be so amazing!!! Love your work.
Ia Lugo
2020-03-24 18:47:15 +0000 UTC
A beautiful piece and so valuable to study the process. I'm a digital beginner and I use Krita . It is something for us non-professionals--free but quite capable. Do you know if any of your brushes will import into the program?
Greg Schultz
2020-03-24 17:23:48 +0000 UTC
Amazing! This is really helpful! Thank you 🙏
Kaja Bednarz
2020-03-24 17:23:02 +0000 UTC
So beautiful 😍
dana_i_nana
2020-03-24 17:17:35 +0000 UTC
This is insane, your are incredible artist! I go looking for my jaw on the floor..:)
Andrey Lukovnikov
2020-03-24 14:41:19 +0000 UTC
So lovely☺️ 🙌💪
salitre insano
2020-03-24 14:04:14 +0000 UTC