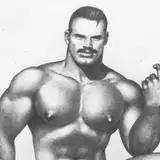
Here is the process summary and the PSD file for the "Painting Anatomy" workshop! I hope it can serve as a guide to render believable figures.
1. DRAWING.
Probably the most important stage. A good drawing is a good plan. It should have well established structure, proportions, and a solid indication of light and shadow - more specifically, the delineation between light and shadow using core shadow lines and clear shadow shapes.
2. COLOR BLOCK-IN
Using a big brush, I softly lay in base colors for my shadows and lights. The key thing to include is a lot of subtle variations in color and temperature to give skin it's liveliness. I also try to create color and value contrast by using warm lights and cooler shadows.
3. FORM MODELING
This is when the figure really comes to life. I zoom in a bit and start refining the surface anatomy of the figure using subtle variations of hue and value. I do this above the drawing layer to fix things I didn't quite get right in my drawing.
4. DETAILS
The final pass over the whole figure. At this time I can make global color changes like a value adjustment or color glazes, but I also focus on the small details like the highlights in the hair, rounding out the form in some areas, veins, accentuating bony landmarks, etc. I try not to get tooo carried away, as this can lead to undoing a lot of the modeling work, and getting too fussy with a painting.