Hello, my darling patrons and friends, and welcome to the third episode of the new Making It monthly series, where I take you step-by-step through how I make important pieces of my freelance art business.
Throughout the series I’ll be sharing how I make my handmade earrings, enamel pins, custom portraits, process videos, stickers, product photography, and more, so you can be empowered to try making a new product or adding new techniques to your own process.
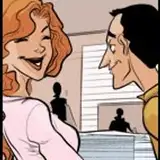
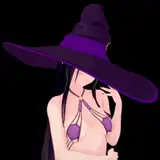
For this third episode, I’ll be sharing my process for making Posca drawings!

Posca markers are a Japanese brand of paint pens and markers that draw with a very thick layer of ink akin to acrylic or gouache paint. They’re smooth and super opaque, with lots of bright colors.
I’ve used Posca markers for sketching, clay and shrinky drink earrings, my animal illustration series, commissioned portraits, the last two years of Inktober, and a huge mural installation piece. The chunky opaque markers have changed the way I illustrate and design. This guide is not sponsored, I just love them!
I love them, but I do think they have a few quirks that can take some practice and getting used to. I’ve had a lot of questions over the years about this material, so I hope this guide will be helpful to those trying to get into working with paint markers! There are many other brands of paint markers, so although I’ve only ever used Posca feel free to expand and experiment!
This guide will be about how I use Posca markers for finished illustrations, for things like portrait commissions and Inktober. Sketching and experimenting is obviously much more relaxed, but I like this process for keeping my Posca illustrations clean and frustration free.
Let’s get to making some Posca art!
. . . . . . . . . . . . . . . . . . . .

M A T E R I A L S
+ Paper! You can draw on so many different surfaces with Posca markers, (check their website for some ideas), but it’s good idea to test on a lot of different types of paper if you can before you start a whole piece.
My favorite paper for Posca markers are a smooth finish Bristol, vellum surface Mixed Media paper, or hot press watercolor paper. Something with a fairly heavy weight and smooth surface. Posca does fine on sketch paper, it doesn’t really bleed through the paper like alcohol based markers, but repeated layers can make the paper curl up or tear through.
I personally don’t like rough surface papers like cold press or similar, as it gives the markers a fuzzier, rougher look. But experiment to see what you like!

+ Markers! So many different pen nib options! Above is my collection. My most used are 5M and 1M. For some pieces I use only those two sizes, 5M for big color areas and 1M for edges and details.
I recommend going to your local art supply store if you can and testing the different nib sizes and colors! I also recommend starting small when buying the markers, don’t buy a whole set before you know if you like them or not. Get yourself a limited palette (I started with primary colors of course) maybe in one chunkier and one detail size. Then expand from their if you’re loving them.
+ Sketch! My favorite pencils for sketching are Caran d’Ache Sketcher pencils in Non-Photo blue or red. If you haven’t heard of these before, they’re typically used by artists who sketch a piece, ink or draw over the sketch, and then scan the final into their computer. The scanner doesn’t pick up the bright blue color, which means they don’t have to edit it out by hand. I like them because they draw smoothly, are super sturdy (don’t snap), and most importantly erase SO cleanly.
+ Scrap paper! Essential! I have a big stack of recycled cheap computer paper that I use for sketching, planning, and cleaning off my marker nibs while I work. You should also save any cut scraps of the paper you’re going to use for the final to have somewhere to practice tricky details before you work on the final.

P R O C E S S
+ Sketch! I almost always plan and sketch my illustrations ahead of time, and that’s especially true for my Posca pieces. It is possible to layer the colors and shapes and correct mistakes/make big changes, but it can get messy and tricky. So my first step is sketching until I have something close to a design I like. This stage is usually VERY messy so I don’t take too long.

+ Palette thumbnail! Test out your rough color palette in a thumbnail to make sure it works! This is especially important to know where your whites and lighter colors are going to be, since those are the hardest to build up on darker colors.
+ Prepare final paper! I like to make sure my pieces are going to fit a standard frame size so future customers won’t need to get expensive custom framing. I usually measure my paper to 8x10” or 5x7” using a ruler and very light pencil marks. I also always draw center lines on the paper to make sure my piece is centered. To cut my paper I use this paper trimmer, and always save the scraps for future use.
+ Sketch on final paper! Draw your sketch super lightly on your final paper.
Some techniques I’ve used for preparing the sketch of a piece:
If you don’t have a light box to help trace, you can try taping your sketch to a sunny window and taping the final paper on top of the sketch (make sure to use artist tape or stick the tape to your pants a few times so it doesn’t rip your paper.) Or, you can do like I do and use my iPad as a light box! Just enable ‘guided access’ from your settings, pull up an all white image, turn on guided access, and trace!
+ Draw! Working in light layers, start drawing!
+ Finish! Once I’m happy with my art and it’s totally dry I gently rub my fingertip on any small paint/paper balls that accumulated in the drawing process. And finally, I erase any extraneous pencil lines, and sign it!

T E C H N I Q U E
+ Shake it! The tip of Posca pens and markers dry out fairly quickly while drawing, so to keep the ink flowing you have to frequently shake the pens (to stir up the ink with the little ball inside it) and pump the tip on scrap paper. When they’re drawing correctly (to me) the ink flows smoothly and very opaque, without really any ragged edges, and you can watch it slowly dry. If you’re shaking and pumping it and and the ink still isn’t flowing smoothly, then you might be out of ink. Way to draw!
Note, pump the markers on scrap paper instead of on the final paper. When a pen gets old it can sometimes break and spill out too much ink, and you don’t want that accident to happen on the final piece!

+ Paper shreds! A big complaint about Poscas! After making sure your paper isn’t too thin or textured, there are a few things you can do to prevent these paper shred/balls from making your lines all ragged.
First, don’t press too hard. The ink should flow easily from the nib.
Second, let the first layer of ink dry completely before adding another layer. That way the ink is building up on itself instead of through the paper.
Third, if you see the little shreds building up on the nib, clean it off by rolling it on a piece of scrap paper. (Rest the tip on the paper and spin the marker while pulling backwards.) The paper gunk does build up a lot even when being careful, you just clean it off.
Finally, as I mentioned earlier, when your drawing is done and dry you can rub most of the rolled up bits loose with your finger and shake them off.

+ Colors mixing/bleeding. If you draw over a color before it’s dry, or draw a light color over a dark, the second marker will pick up color from the first. Just like with the paper shreds, use the scrap paper to draw until the other color is cleaned off. Yellow, White, and Pink are especially prone to this.
Remember to draw in light layers as well, because the wet upper ink will reactivate and mix with the dry lower ink if you scrub too much. Be patient.

. . . . . . . . . . . . . . . . . . . .
R E S O U R C E S
. . . . . . . . . . . . . . . . . . . .
There we go, friends! I hope you found this guide helpful, especially if you like the look of Posca drawings but were intimidated to try, or if you got some but felt like you can’t get the hang of them. Posca markers are accessible, but they have a learning curve just like all materials! Give them a go and see if they fit with the way you create!
Let me know in the comments: Have you used paint markers before? Is there anything about them that you find tricky? What’s the most unusual material you’ve used them for? Or do you have any fun ideas for paint marker creations for your future?
And of course, drop in the comments any requests for future episodes of this Makin’ It series. I’m always looking for ideas and I want to share about what you’re interested in!
Finally, I appreciate your support here on Patreon SO MUCH!! There have been months lately that it’s been so hard to get myself to even think about anything creative, but your support keeps me going. If you’re having a hard time this year, I see you, and I’m here for you, just like you’ve been here for me. We’ve got each other.
Be nice to yourself, be nice to others, and go make some art.
xoxo, Ragon
Ragon Dickard
2020-06-15 19:06:35 +0000 UTCJulia Solaire
2020-06-13 03:35:28 +0000 UTC