Subsurface Scattering write-up Part 1: Base Shader
Added 2018-08-22 01:20:59 +0000 UTC
(SSSS? Subsurface Scattering Skeletons!)
If you haven't yet watched the video on this shader, you can view it here: Subsurface Scattering for Foliage (without raytracing)
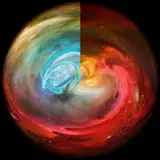
There are two parts to this subsurface scattering shader. The first part makes light glow through a mesh by calculating the dot product of the view direction and the negated light direction. This is the basis for the effect.
This works regardless of the meshes normals or position in space, and simply creates a circular gradient around the light source, so as it travels behind the mesh (in the case of directional lights which are infinitely far away), the object will light up. Coincidentally, this is also a good way to create a glow around the sun in a sky shader.

The next part of the effect is an attempt to simulate what parts of the object are thinner or thicker, and adjust the light pass-through accordingly. This is where the most fakery comes in, because without raytracing the best we can do is get something that visually approximates light penetration. So from here you can use whatever solution you think gives the best result for the mesh you are using. For something like grass, I've found that it's often best to ignore this second part of the effect altogether, and simply rely on the light pass-through in step 1, perhaps multiplied by a texture map. But for more physical, rounded objects, you'll get a better result by boosting the light around the outside edges of the visible mesh, either with a Fresnel mask, or by adding in the surface normals to the light direction before you send it through to the dot product with the view direction.

This gives you a pretty convincing SSS Mask. Multiply this by an interior colour (say, red for a skin shader, bright green for foliage), and add it to a standard lighting model, and that's the basic Subsurface Scattering shader complete.

Another thing I like to do, although it's a subtle addition, is to lerp between the light colour and the interior colour, based on the SSS mask. Adjusting the mask with a power controls the fade between the colours.

Another, more complicated tweak I like to make to this shader, is splitting up the way it handles directional lights vs point lights (In Amplify Shader Editor, you can use the World Space Light Position node to get the light type). If you want to use this shader with point lights, you absolutely need to multiply the mask by the light attenuation, otherwise the lights will just pop in when they get close to the mesh. But if you do this, then the shader will be masked by shadows on any directional lights, because light attenuation (infuriatingly) contains both the falloff of point lights as well as the shadows information. As far as I know there's no way to split these two bits of information apart.
In my setup, I only use shadows on my main directional sun light, so my workaround is to only have light attenuation on point lights at 100%, but allow it to be adjustable on directional lights, so I have control over how much the shadow degrades the SSS Mask. For foliage, it's nice to be able to see shadows through the leaves, but you don't always want the shadows to destroy the effect altogether.
In addition to this, since I've already split up the way it handles directional and point lights, I allow point lights to add to the SSS mask simply by their attenuation, rather than requiring them to be behind the object. This way they add a nice glow as they pass inside or near to the surface of an object, which is a more pleasing behaviour in my opinion.

(with pointlights added inside skulls)