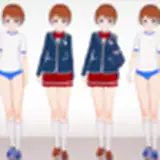
beWilder Presents: NTR Title Render - How its Done
This is how we do it
Sha-la la-la-la la-low…
This is how we do it…
It's Friday night, and we feel all right,
The party’s jumpin’ on the Discord,
So I reach for the icon and I click it up,
energetic fingers tap the keys of my board
Drop some lore ‘cause you’ve waited
Fans in the chat say, "Unshi, how’d you make it?!"
They look so good, on our HUD, tonight…
The girl’s in their skirts, heels clacking in their stride,
Oh no! The gang bang scene’s burnin’ up the hard drive!
Well, we got a vid for you, ‘bout how our games get made
So tip that ‘like’ button, throw your hands up
And let us hear all you fans say
“We’re hyper buzzed and it's all because (This is how we do it)
beWilder does it like nobody does (This is how we do it)”
… ok, ok, cut the music! We’re sorry, we couldn’t help it… we really just couldn’t. That was too much fun to pass up. For any of you who are totally bewildered (wordplay! That’s the stupefy meaning intended there) by all that, or for those of you don’t automatically break out into Montell Jordan rapping when they hear the phrase “This is how we do it”, then this video is for you…
"This is How We Do It" - Montell Jordan (1995)
But that is not the best video we have for you today! Oh yes, we’ve got a special video for you all. We’ve been asked a fair bit about out creation processes in the last while… as you know, quality always draws interest… so we figured we’d show you just what goes into a single render on our end. With that said, this week Unshi worked on a new in-game title image for NTR and filmed the whole process. Here it is… (or check the top of the post)
beWilder Presents: NTR Title Render - How its Done
… For those of you who just don’t have the time to watch over the whole 20ish minute video, we’ve got some highlights for you now. But we do recommend watching the video, it’s pretty cool to see the behind the scenes work in action.

1- Character Work
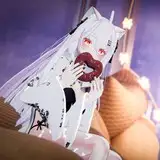
Before starting I’ve pictured in my head the general image I’m going for and I know the basics. Noe lost in her thoughts looking outside the window in a rainy evening. That’s the premise.
Having that in mind I let the scene speak to me on the detailing of the character. She’s not at work so I start with her casual set. She’s at home already relaxing so she probably got here a while ago and took off her t-shirt, shoes and make-up; that’ll make a sexier image.

2- General Scene
Again, I know the setup I’m going for, so I place all the elements right from the bat. What I don’t know is how they’ll look or the camera angle, so I keep playing a bit and moving things around until I find something I’m happy with.
I change a few shaders here and there and remove the elements I don’t need from the scene, but the work here is pretty basic; the scene will be mostly decided in the effects and illumination sections.

3- Posing
I wanted her to be leaning on the edge of the window but turns out it is too low for her to be leaning comfortably and I don’t want her to be sitting down in a chair (since I want her as close to the window as possible, so I can get a much closer close-up for details on her).
I place the feet on the ground, so I have a real reference on her height and I do a lot of hand detailing even though it’s deprecated in the end because of the camera angle. As I always do I try to keep things realistic, so I can change the camera angle at any given moment and still look fine. You never know what you’re missing when looking at the scene, so having some “intentional non-realistic” things can come bite you in the ass later.

4- Effects
Here’s where I have to turn a general boring scene into the one that gives that expression to Noe. I start with the rain since it’s the main and most important element in the scene and I try to make it as dense as possible since it’s seen through the window; and between that and the general blur it’ll be barely visible otherwise.
Again I add a few details I end up not liking, like the lamp and the cord. I wanted to give Noe a light in her back, very close, so it would make a good contrast with the rest of the scene and produce a much warmer sensation on the user looking at it. Turned out it captured the attention too much and I ended up just deleting it a few moments later.
Cars and water effects are barely visible (one could argue that they are not even visible) in the final render. I saw that in a few pre-renders I did and still decided to keep them. I prefer the user to not see that they are there than to see that they are not there.

5- Illumination
Illumination comes from 4 different sources this time. The general environment scene has a clear day illumination since I need to be able to work with a pretty well illuminated scene with photoshop later.
Noe’s apartment is self-illuminated but it’s dark, so I add a warm light on top of her bed just to give it a bit more clearness.
Noe has two additional light sources aside from the environment and the room. A white general light on her front and a blue big fat light outside the window to give me something to work with in photoshop later when I’ll make that evening look.

6- Pospro: Cleaning
There are a lot of details to clean in a render and a lot you didn’t even see. This time was no different. From the usual poke-through on her bra to a lot of water droplets that made it inside Noe’s apartment there are a few corrections to make.
I also didn’t like the final pose of her left breast, so I just quickly changed the shaping into a more round and sexy one.
Finally, I end up blurring the whole window besides Noe’s reflection. It’s not a realistic touch by any means (no camera does that) but we’re not a camera, and we humans do focus on things. It creates a sensation of you focusing on Noe and the reflection and it doesn’t look weird. At the same time, gives much more needed attention to Noe, which is what we should always go for.

7- Pospro: Color Work
And here is where the scene turns into an evening scene. I change the colouring of the scene to increase the contrast between Noe’s apartment primarily yellows and the outside of the window’s blues.
I fix a few final issues with the nose being too red and her skin having a few artefacts and I add a couple more water droplets to make it super obvious at first glance that it is raining outside.
And here is the end result!

Worth it! This particular image took about 6 hours to render (thank you rain and close up Noe!) on top of all the work done in the video. Most other renders take significantly less (around an hour or so), though the more characters visible in the shot starts to increase that time again exponentially. Stack that up 70-80 times and we have an update’s worth of content. Like we said, it’s totally worth it… hard work is for now, hot is forever!
Alright, that’s it from us again today. We’re going back to working on the games and leave the rapping for another day (think of what we could have done with Dexy’s ‘Come on Eileen’…) come shout out on the Discord on how awesome / sucky our rhymes are. We can take it! We’ll be working through the weekend on both NTR v0.1 and Naked Nat’s Wallpaper too, but we’re free enough to chat while we do… it’s not crunch time just yet! All you Bold backers out there, get yourselves packed and ready to roll out come Monday as Lara will be by with her Last Raider comic pages 1-3, so get hyped up! Now then, we tip our pimp hats y’alls way as we get back to it, so as always:
Be ‘kinda buzzed’ and beWilder!
beWilder
2018-04-13 18:46:30 +0000 UTCbeWilder
2018-04-13 14:23:43 +0000 UTCBailey Nelson
2018-04-13 14:11:22 +0000 UTC