I had an ask over on tumblr about how to tweak MXAO settings in the latest versions of ReShade. I thought I'd do a quick tutorial setting out how best to learn what everything does, along with an explanation of each of the settings. This will cover the basics, and assumes you already know how to install ReShade and make sure the depth buffer is working.
This tutorial is a starting point to help you begin your journey; if you have any questions, please don't hesitate to get in touch in the comments here, or over at tumblr, twitter, or my discord server, where I have a dedicated ReShade channel. There's no substitute for getting stuck in and learning on the job, and hopefully this will help give you the confidence to jump in with both feet!
---
NOTE: Before you start playing with settings, you might want to make a new preset just for your testing so you don't lose any settings in your other presets. At the very top of the ReShade menu, next to the box with the name of your current preset, is a big plus sign + click that, and you can enter the name of your new preset, hit Enter, and it will take you right to it! You can choose to duplicate your current preset to bring the settings across, or you can start with a blank slate.
---
All pictures used in the text can be enlarged at the top of this page to see them more clearly.
---
If you want to get a good idea for what all the settings do, the best thing to do first is enable debug mode (there's a little drop-down box towards the bottom of the MXAO settings where you can select debug - you want AO/IL channel). Then wait a moment for your heart to settle after freaking out because your screen turns grey. That's normal! That's what you want to happen!
You should see the basic outlines of everything. So, you'll see a big chunky flat grey sim, a flat grey tree, whatever. And you'll be able to see where ambient occlusion and indirect lighting (if you have that option enabled) are affecting the various objects in the scene.
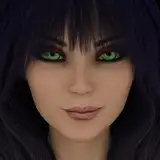
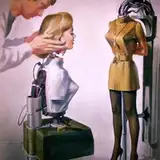
Here's an example of what you'll see.
Without debug:

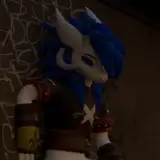
With debug:

Terrifying!
But you can see the MXAO really well, right?
Now you can go in and move the various sliders around a bit and see what they do. Go line by line, setting by setting, and pay attention to what happens when you move it all the way down and all the way up.
Some of the settings interact with one another, so if you change one, then go and change another, you might want to go back and change the first one again to compensate.
Most of the settings should have tool-tips that give you a hint about what they do when you hover over them.
Also, take a look at the shader-specific preprocessor definitions. Here’s how I have mine set up for qUINT_mxao:

I’ve enabled IL (indirect lighting), as well as two-layer. Two-layer gives you some extra settings under the ‘Double Layer’ section. It can be useful for a little bit extra fine tuning, but isn’t strictly necessary. You will want to turn on Smooth Normals though, to help reduce a little bit of the blockiness you get with a low-poly game like TS4.
---
Now, the various settings:
Sample Quality - as it suggests, this controls the quality of the shadowing, whether it’ll look particularly noisy and messy, or smooth and buttery. Higher settings have a considerable impact on performance, so it’s a trade-off. Mid-range settings are usually good enough for most things. Lower settings will be more noticeably messy in debug mode, but it won’t be as noticeable back in the game.
Sample radius and normal bias: these sit together for a reason - they control how tight the shadows will be around your objects, or how softly they spread out, as well as which objects will shadow each other. You need to change both of them together to get the look you want. These are probably the hardest settings to understand - but even then they're not that difficult!
- Sample Radius: the higher you go with this the darker things will seem. What's happening is the shadows are spreading out further the higher the value, engulfing more and more of the objects in the scene. If you go low with this, you can get some of those nice, tight shadows that just shadow a Sim's face, under their chin, between their arms and their body, etc. If you go higher you can get nice, soft, squishy shadows behind objects.
- Normal Bias: on the face of it, this has the same effect as sample radius above, but in the opposite direction - with higher values producing weaker shadows, and lower values producing darker, bigger ones. But it's actually doing something a bit different. The tool-tip says it reduces the 'self-occlusion of surfaces that have a low angle to one another'. In practice what this means is the higher the value the more realistic the shadowing. In reality, we wouldn't expect every single object to cast a shadow on every single thing behind it, but there are limitations to what ReShade understands about what's in front of it, so we have to help it out a bit. Raising this stops some of the unintentional shadowing. But if you're after really, really strong shadows behind everything, drop this down low!
So, you can see you need to play with both of these settings together to get the look you need.
Render Size Scale: you’ll probably want to leave this at 1.000, but there have been occasions where I’ve dropped it all the way down - it’s one of those you don’t really need to worry about though.
Ambient Occlusion Amount: self-explanatory - controls how dark the shadows will be. Higher values = stronger, darker shadows.
Indirect Lighting Amount & Saturation: Same as above, does what it says. Indirect Lighting (IL) adds colourful lighting where it thinks it would be reflected from the objects around it. It's not terribly accurate, and the same settings can be perfect in one place but too strong as soon as you move the camera. It's definitely one of those settings you need to be comfortable with tweaking from time to time if you choose to use it. But if you do use it, the results can be spectacular in the right circumstances.
Note: consider trying out the RadiantGI shader from the Astray shader pack for a more comprehensive and fully-featured version of IL. But maybe only try it once you've got the hang of tweaking other shaders first. It's a bit of a monster. A beautiful monster, but a monster all the same.
[If you’re using two-layer/double-layer,] Fine AO Scale is similar to Sample Radius, in that it changes how tight or wide the shadows are (lower is tighter and lighter, higher is wider and darker). The two intensity multipliers are a bit like ambient occlusion amount.
Blending Mode: You likely don’t need to change this, leaving at 0 will be fine.
Fade Out Start/End: You don’t really want MXAO shadows all the way to the horizon, because it can look weird, especially if it gets foggy in the distance. I have mine set to - Start: 0.050, End: 0.400, but you can pull the End value down or up depending on if you want shadows to stop a little sooner or a little further back.
If you use the main MXAO shader (so, not the qUINT one) instead, things will be laid out a little differently, and you’ll have a couple of extra options available to you (it's called MainMXAO in this screenshot because I've edited it to be able to be used alongside qUINT_mxao. Ordinarily it's just called MXAO.fx and is in the main Shaders folder).

The additional settings are:
Indirect Lighting Saturation Filter: This helps you control the strength of the IL saturation a bit more, to avoid it looking too weird. This can be really useful to reduce over-strong indirect lighting in corners or at the edges where things meet.
Indirect Lighting Gamma: This acts like a second Indirect Lighting Amount control, letting you reduce the overall strength of it.
AO Gamma: Similar to IL Gamma, this acts as an additional control over ambient occlusion amount. I like to use both of these as a quick way to drop down the strength of them without losing my overall intensity settings.
---
So there you have it - that’s what the various settings do! Once you’ve played around with them in debug mode, you can fine-tune your settings back in regular mode to make sure they look good out of that grey blocky hellscape!
And don't worry, it is really scary playing around with settings for the first time. There are so many of them, and it's very easy to feel overwhelmed or out of your depth. But you're not going to break anything, it's all going to be okay!
---
NOTE: Remember to keep MXAO at the top of your load order!
---
Also remember: you can push any of these settings beyond their slider limits by control+clicking in the box and typing whatever number you want.
The slider limits are set by the shader author because they’re what they think looks best - but in many cases you can push them further and get better - or just different - results.
This is true of any shaders (although you will sometimes run into a setting that does nothing at all beyond its slider limits). Once you get a little more confidence it’s well worth experimenting and seeing what fun things you can do! For example, I’m using RadiantGI a lot at the moment and the General Ray Length setting maxes out at 250, but I push it to 400 and beyond sometimes, depending on the scene and what I want to achieve. I will not be beholden to arbitrary limits and neither should you be!!! Messing with limits is often how you discover some truly weird and wonderful things for the more artistic effects you sometimes see too!
Go forth, experiment, and create greatness!
---
All pictures used in the text can be enlarged at the top of this page to see them more clearly.