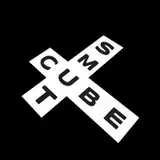
Hello! This was a very sudden project for me I wanted to take a day on the side to do. This is the result! I took inspiration from many sources, from mid-late 1990's 3d studio logos to I Spy books! Also, the 2005 movie Robots. I cannot comment on the quality of that movie really ( I haven't seen it since it came out when I was very young), but the logo design for it is right up my alley.
Above you can see the raw output that blender put out before running it through post editing! (and the final version posted on twitter) I did a lot of color correcting in post which is why the final version looks brighter/greener. I don't really talk too much about what I do in post editing for these, but I actually use a very similar process I use for the post effects in my drawing work too;
The first thing I always do is split the image into separate layers for the R, G, and B color channels and blend them together over a black background. The end result looks the same, but it allows me to distort and/or blur certain color channels to create a very analog looking effect. It's hard to tell with the lower resolution and color count, but the blue channel is ever so slightly shifted to the right, which creates yellow outlines on the left side of objects. This is a technique I use *extremely* often because it just always looks pleasant to me and makes edges look less, idk, "digital".
After doing that I threw a very slight horizontally blurred noise filter blended into the colors to give stuff a little more texture, then crushed everything down to 128 colors for the final result!
Now for the 3d stuff:

The whole scene is 661,016 tris. A lot of these come from stuff like the metaballs used for the paint dripping which are rendered at a high polycount because cycles doesn't play nice with lower poly objects. Also the globe model.

I originally just used a bump map to mimic depth where the land is, but I wanted it to show properly on the edges so i ended up subdividing the whole thing and using the height map for displacement instead.


This and the spray coming out of the straw heavily used metaballs to create the look of paint, though in a way that was intentionally more primitive looking.

it was also designed to be viewed only from *very specific* angles :p
Speaking of the brush, this is actually the first time ive really been able to wrangle in Blender's hair rendering features. I haven't had good experience with them in the past, but this worked out quite nicely. Also, fun fact, they use the exact same material as the wooden brush handle.

The spring behind the 2 E cylinders, the straw, and the balloon all once again use my favorite technique that anyone who has seen my previous behind the scenes posts should be familiar with. Using a repeating array on an object and bending it around a curve. Yes, I do in fact use this in literally everything, any chance I get.

The chalkboard was actually introduced extremely late into the project. Initially it had a white background, then a flat black one with an invisible white one to add extra gloss to objects, but I finally settled on this chalkboard-esque look.
Finally, heres some early renders as i progressed through making it!


This last one was very close to being the final one posted, but I decided after rendering out the whole thing that I didn't like the paintbrush being covered up like that hgfhghf
Sentry Jman
2021-05-22 21:49:40 +0000 UTCSentry Jman
2021-05-22 18:58:46 +0000 UTC