Chapter 1: Introduction
If you've read my previous guides on Patreon, you'll know that while I try to make them accessible and straight-forward, they're generally aimed at users who already have experience with WoW 3D art and the tools used, while focusing on a single topic.
People frequently ask me if I have a tutorial for beginners that covers the entire process of making artwork, so that's what this guide aims to be: a step-by-step process on how I make artwork.
This guide is not a definitive "this is the way" walk-through. It's important to keep in mind that there are always multiple ways to achieve something. Everyone has their own methods and personal preferences that make up their style; this is just my way.
While this is aimed at beginners, I'm going to assume some very basic familiarity of the controls in Blender such as moving around the scene, selecting objects, etc.
If you encounter any problems along the way, don't hesitate to ping me in the #champions-lounge channel on my Discord server; the channel exists just for you!
Finally, I know some people prefer to see things in action, so I've also recorded a run through of this guide, which you can watch here. If I fail to explain anything properly in the guide, hopefully the video helps.
Chapter 2: Preparation
Before we can get started, we're going to need some tools.
(Required) Blender: This is my 3D software of choice that we'll spend most of the process using. It's free, open-source and (in my opinion) the best 3D software available.
Website: https://www.blender.org/
Version used: 2.92+
(Required) wow.export: For exporting all the data we need from WoW. For transparency, I am the lead developer of this tool, however it's completely open-source and free.
Website: https://wow.tools/export/
Source: https://github.com/Kruithne/wow.export
Version used: 0.1.29+
(Required) NodeJS: I leverage a number of scripts I've written in NodeJS for automation. Some sections of this guide rely on it.
Website: https://nodejs.org/en/
Version used: v15.3.0+
Chapter 3: Character Design
The very first step in creating a piece of art is to design the characters that are going to go into it. For this, I use the Wowhead Dressing Room. It's a free online tool that always supports the most up-to-date races and customization, allows equipping of any item in the game, and as you'll see later in the process, provides a key role in setting up our character as a 3D model.

Go ahead and set yourself up with a character using the dressing room. You can import existing characters from the Blizzard armory by clicking "Import" and then entering the region, realm and character name.
Additionally, if you'd prefer to outfit your character in-game, the fantastic Narcissus add-on allows you to export to the dressing room by clicking the "External Link" button. If you go this route, I recommend checking out the MogIt add-on as well, they go great together!

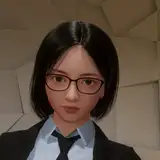
For this guide, I'm going to be using the human mage displayed in the first screenshot above. If you're following the guide strictly (which I highly recommend for first time/inexperienced users), feel free to use the same character which you can access by clicking here; it will make following this guide a lot easier.
Chapter 4: Character Model
In this chapter, we're going to take the character from the dressing room which we set up in the last chapter and put them into Blender.
I recently published an in-depth guide on character models, which I'm going to be following heavily in this chapter.
The first thing we need is one of my character rigs, specifically of the race/gender of your chosen character. You can find all of my character rigs here.
As mentioned in the character model guide: "These rigs are the culmination of months of work on my part, so I'd ask that you don't share them. It only costs $3 to access this guide, and that support allows me to continue making things like this for you awesome people."
Since the character I'll be using in this guide is a human female, I made sure to grab the HumanFemale.zip from the repository linked. Extract the files somewhere on your PC. Each ZIP should contain a .blend file as well as some placeholder textures.
Open up the .blend file and you should be met with the following (or similar) screen, or that of the race/gender you decided to use, if not human female.

The advantage of using these character rigs that I've created is that nearly all of the hard-work involved in getting characters into Blender is already done for you. Each race comes complete with all available geosets (a geoset is a toggleable part of the model, like hairstyles and horns) weighted and labelled, as well as pre-made skin shaders.
The very first thing I do when starting a new character is to save a new copy of the character rig file. That allows us to CTRL + S freely to save (in-case of a crash or mistake), without accidentally over-writing my original human female rig.


Let's start by enabling the right customization geosets. In the top-right panel - this is the "Outliner" panel - you'll see a long list of geosets. Start by looking at the hair styles available.
By default on the human female, you'll see the Ox Horns hairstyle enabled, which is called HumanFemale_31_HairOxHorns. I've named all customization options as they appear in the character creation screen (or as close as possible).

To hide this geoset, simply click the little eye icon next to it, highlighted in the above image. Your character should now be bald, for now. Looking at our character in the dressing room, we're using the hairstyle "Rushed", so let's find that.

Once you find the right geoset, in this case HumanFemale_19_HairRushed, simply click the closed eye icon next to it, and the hair style should now be visible on the character.
Now let's do the same for the necklace, since in the dressing room our example character is using the "Jade Pendant", but that's not what our character model starts with.

As shown, we hide the HumanFemale_92_NecklaceRuby geoset, and enable the HumanFemale_94_NecklaceJadePendant geoset.
Repeat this process for any other customization options: hide the ones that you don't want, and show the ones you do; piercings, earrings, necklaces, horns, blindfolds, etc.
It's good to note that you're not limited the same way you are with in-game customization, if you want to use two piercings (for example) that would normally be a one-or-the-other situation? You can have them both, just enable them as you please!
Next up, you'll notice the character rig starts with a cloak, but we don't want a cloak for our character. Rather than trying to find the cloak in the Outliner, we can simply select the cloak in the 3D view and press H to hide it.

Now that we've got our customization sorted, there are a few final touches we need to make to the geosets.
Take a close look at the character in the dressing room and compare it to the model. Ignoring textures, there are still a few differences with the 3D model itself; let's play spot-the-difference.

For the sleeves, there are a few variants available. For the outfit we're using, we want to enable the HumanFemale_45_WristsB geoset.

Again, don't worry about the textures just yet, it's fine that she has skin sleeves. The shoes are fixed the same way, however we need to hide the feet first. This is a simple case of hiding HumanFemale_67_Feet and showing HumanFemale_68_Shoes, which are conveniently next to each other in the Outliner for all races (the ones that have feet, at least).

When it comes to more unique parts of the model, such as shoulder pads, these are never included as part of the character model. Instead, these are "item components", which I go into detail in this Patreon guide. We're not going to dive into them here.
There are some exceptions, however. For example, belts! For older belts - primarily plate - there is a built-in geoset on character models. There is also a rope version, used in a handful of monk-themed belts.

In more recent expansions, belt buckles are generally separate models. So if you can't find what you're looking for as a geoset on the model, the chances are it's an item component.
If your character is wearing anything on their torso, you'll want to hide the HumanFemale_69_TorsoBare geoset and show the HumanFemale_70_TorsoArmour instead. There are a few exceptions to this, but we'll not worry about them here.
Finally, the last thing left to do is the robe. With the outfit we've chosen, the character is wearing a robe, so we hide the HumanFemale_53_Pants geoset and show the HumanFemale_54_PantsRobe one instead.

Chapter 5: Acquiring Character Textures
Our character is looking good, aside from the fact that they're outfit is made of flesh, which isn't in fashion this season. In this chapter, we're going to look at getting some textures for our characters, and in the next chapter we'll put them on.
I recently published a guide on character models which goes into a deep-dive about texturing characters. In this chapter, we're going to follow that guide step-by-step without all the explanations.
Make sure you have my character texture acquisition script downloaded somewhere and open a command line terminal in the same directory. The quickest way to do this is Shift + Right Click in the directory and open your terminal of choice from the context menu.
Depending on what you have installed (and configured), your choice of terminal may vary. Command Prompt, PowerShell, Git Bash or Windows Terminal are all fine.

In the terminal that opens, we want to run the following script "node download.js <character> <URL>" without quotation marks. Replace <character> with a name for your character, and <URL> with the URL of your Wowhead dressing room.
Using the dressing room from my example, which we'll call MyNewCharacter, the command would look like: node download.js MyNewCharacter https://www.wowhead.com/dressing-room#dzzz0zM89c8f8zP8r8zt8w8Me8i8MH8wJ8mCL8sm8zyd8R08zd18RZ8zjb8RB8zA28RQ8zTD87QTPa87VTPb808TPk87cTPs808TPo87a
Hit enter and give the script a moment. If it's your first time running the script, it will take a few extra moments to install some dependencies. Once done, your terminal should look something like below.

Check the folder where you stored the script and you should notice some new additions. You can ignore node_modules, package.json and package-lock.json, these are just for the script. Alongside them, you should see a new folder named after your character, in this case MyNewCharacter.

If you open that up, all of the textures we need for the character have been downloaded into the folder neatly and conveniently organized.

Chapter 6: Character Skinning
In this chapter, we're going to texture our character, still following along my recently published character model guide.
Switch back to Blender. Let's start simple by swapping out the hair texture. Select the hair mesh in the 3D viewport. On the right-hand side under the "Material Properties" tab, you'll see the materials assigned to a mesh. In this case, it's only one: HumanFemaleHair.

The bottom panel (by default in my character rigs) is set to the Shader Editor; this will automatically show the shader for whatever material we have selected.

There are three nodes on the hair shader, from left-to-right: Image Texture, Diffuse BSDF, Material Output. Don't worry about the last two, let's focus on the first one.
An Image Texture node provides an image source, generally from your PC. By default, the shaders on my character rigs are using placeholder images. To swap it, click the Open Image icon on the Image Texture node.

Clicking that will bring up a file browser. Navigate to the folder filled with your characters textures that we acquired in the previous chapter and select your characters hair texture.

So far? So good. Let's move on to the skin itself. Select any part of the character that has skin. Legs, arms, torso, etc; they're all using the same skin shader.

Selecting the HumanFemaleSkin material assigned to most of the geosets, you'll see a much more complicated looking shader in the lower panel.
While not required, I highly recommend the Image Node Preview add-on for Blender by Simon Wendsche. That's adding those little thumbnails above the Image Texture nodes, which helps tremendously in situations like this.
Start by selecting the Image Texture node labelled 'Face'. Just like we did before with the hair, click the Open Image button and then select our characters face from the textures in our folder.

To keep the shader tree compact, the nodes are collapsed. Rather than expanding them (the little arrow on the left of the node name), we can simply click on a node and then access the Open Image button on the right hand side Item tab, as shown above.
Repeat this process for the skin, makeup, eyebrows and scalp textures. For each rig I've created, the skin shader contains placeholders for the base customization textures such as makeup, tattoos, scars, body paint and so on.

Now let's start putting on the characters clothing. This is where things start to a get a little bit complicated - but once you get used to it, the process is super quick.
At the bottom of the shader you'll notice two "underwear" nodes. Select both of them (hold Shift while selecting) as well as the Add and Mix nodes beside them.

With all four selected, press Shift + D to duplicate them and move the new duplicates off to the side.

Pretty straight-forward so far. Now, with the two nodes we just created, select one and then click Open Image, just like we did before with all the other nodes. We're looking for the upper torso texture, which is identified with the "_tu_" (for torso upper) in the name. In this instance, the texture is cloth_challengemage_d_01purple_chest_tu_f.

Repeat this exact process for the other node we created, however this time, we want the lower torso texture, which is identified by "_tl_" (for torso lower), in this case being cloth_challengemage_d_01purple_chest_tl_f.

You'll notice both of the nodes are still labelled underwear. To remove/change a label for a node, simply edit the Label field while it's selected. In this case, we'll simply leave them blank.

The next step is to provide the correct UV mapping for both of those nodes. There's an in-depth overview of how all this works in the aforementioned character model guide.
To connect them, click and drag the little blue dot on the right side of one of those nodes and pull it over to the little blue dot on the left side of one of our image textures.
In this case, we want to connect the TorsoUpper node to our bottom node (the tu_f texture), and the TorsoLower node to our top node (the tl_f texture).

I moved the underwear nodes out of the way so you could see how they connect better, but don't worry about connections going over other nodes.
Assuming everything hasn't caught fire, then you're doing great so far. The last step of creating this layer is to mix it into the layer chain. What's the layer chain? That's the string of connected Mix nodes in the shader, before the Diffuse BSDF and Material Output nodes.

To connect it, select one of the existing Mix nodes in the chain (make sure you select one that has the Mix operation selected, not Multiply or anything else) and duplicate (Shift + D) it.

With our new mix node, simply drag it onto the connection between the last Mix node and the Diffuse BSDF node in the chain. When the connection highlights, let go and it will automatically position itself in the chain and connect.
Remember those other nodes we created a moment ago? Connect the Alpha (grey) output of our Add node into the Factor (grey) input of our most recent Mix node. Do the same with the Color (yellow) output of our first Mix node into the Color2 (yellow) input of our layer chain Mix node.

Providing everything went to plan, if you look up at your character, they should now be wearing the top.

Repeat the process of adding these nodes for a total of three more layers consisting of the following combinations:
cloth_challengemage_d_01purple_sleeve_al_f (Mapped to ArmLower)
cloth_challengemage_d_01purple_sleeve_au_f (Mapped to ArmUpper)
cloth_challengemage_d_01purple_robe_ll_u (Mapped to LegLower)
cloth_challengemage_d_01purple_robe_lu_u (Mapped to LegUpper)
cloth_challengemage_d_01purple_boot_fo_u (Mapped to Foot)
cloth_challengemage_d_01purple_glove_ha_u (Mapped to Hand)

If you managed all of that, guess what? Your character looks pretty good right now, and you're done with character texturing. That was it!

As I mentioned before, I'm skipping over a lot of the explanations here and focusing on a step-by-step. If you want a more in-depth guide on character skinning, check out the aforementioned character model guide.
If you're looking to include item components (shoulder pads, belt buckles, etc) on your character, check out my guide on item components.
Chapter 7: Importing In-Game Animations
Currently, our character is stood at a T-pose, also known as a 'rest pose'. You could go ahead and adjust the bones at your leisure to pose them as you pleased, however for the purposes of this guide, we're going to cheat a little and use an in-game pose.
Conveniently, the Wowhead dressing room that we used earlier allows us to easily preview in-game animations.

Take a look through until we find an animation that we like. Keep in mind that we'll be using a still-frame from the animation to make our pose. For this example, I'm going to be using the WALean01 animation for a human female.

Once we know the name of the animation we want to use, we need to get the animation data itself.
At the time of writing this guide, we haven't released animation support on wow.export just yet. But just for you, here's my repository filled with every single in-game animation (all 14,000+ of them) as FBX files.
Take a look through the repository for the animation we want. In this case, it's HumanFemale/WALean01_305.fbx

If you'd prefer to download the animations in bulk for local use, check out the _packed directory which contains ZIP files for each race.
Switch back to Blender and import the FBX file of the animation which we just downloaded (File → Import → FBX). Once imported, you should see another mess of bones.

Before we can make use of this animation data, we need to convert the bone structure to match the character rig. To do this, select the armature in the 3D viewport and then switch the lower panel to Python Console.

In the python console, we want to type the following snippet of code. For the convenience of copy/pasting, I've posted it on a gist here. Be sure to hit enter twice after inputting to the console to make sure it runs!

Providing you didn't see any errors, the bone structure should now be compatible. In our 3D viewport, select both (hold Shift) the character armature and then the animated armature in that order.

To save time running this snippet of code in the future, we can turn it into a Python macro. Check out my recent guide on how to do that!
Now we want to transfer the animation data. To do this, bring up the Make Links menu (CTRL + L) and select Animation Data.

Hopefully everything worked, and your character should now be using the animation we picked out.

We can go ahead and remove the animation FBX we imported. Since it comes with a lot of attachments, the quickest way to do this is find it in the Outliner, right-click and select Delete Hierarchy.

The animation FBX name will start with "character/". Make sure to select the top-most parent of it to ensure everything is deleted.
Now that's gone, switch the bottom panel from Python Console over to Timeline.

In the 3D viewport, select your character armature. In the timeline, you should now see a number of keyframes for your animation. These represent key poses of your model which are interpolated between to create animation.

Go ahead and move the blue seeker along the timeline. For the example WALean01 I've chosen, the frames are very similar, but if you chose a more animated one, such as EmoteCheer, find a frame with the best pose.

Once you've found the best pose in the animation, we're going to convert it to a static pose. To do this, we just clear all of the keyframes (Object → Animation → Clear Keyframes).

And that's it! Now that we've cleared the keyframes, you could go ahead and adjust the bones manually to tweak the pose if you wished; for this guide though, we're going to leave it how it is.
Chapter 8: Scene
Our character is looking good, but we need a set for them to exist in. There are many ways to form a set, from custom building them to importing entire map tiles.
For the purposes of this guide, we're going to keep it simple and use a building interior from the game, specifically a mage tower that's in Ashran.

There are three main methods we could use to figure out the model for this building:
A. Export the entire map tile of Ashran from wow.export.
B. Manually search through all the models on wow.export.
C. Cross-reference the models for the map tile on wow.tools.
Option A is overkill and wastes a lot of time, so we're not going to do that. We're not going to do B either since unless you're very familiar with the naming conventions of models, it will take forever to find it.
Instead, we're going with option C. The first thing we need to do is find out which map tile we're on. To do this, find the map in wow.export (in this case it's Draenor).

On the map overview on the right, we want to find the place where the building is located. For the tower I'm using as an example, it's in Ashran, so we locate that tile.

Now that we've located the tile, we're not going to export it, instead just place your cursor over the tower and look at the tile co-ordinates (the ones in brackets) that are visible.
Additionally, we also want to take a quick note of what the internal map name is. On wow.export, that can be seen in grey/brackets. Conveniently, Draenor is internally called Draenor, but most maps are not that convenient; Pandaria is called HawaiiMainLand, for example.

With the ID of our map tile (39_24) and the internal name of our map (Draenor) in hand, head on over to the file viewer on the wow.tools website.
In the search box, we want to search for <map>_<tile>.adt, so in this example we're searching for draenor_39_24.adt, as shown below.

Once you've found the tile, click the information icon. A lot of information is going to be presented, but the only section we care about right now is Linked child files. This section contains every M2 and WMO that appears on that map tile.
With a quick search (CTRL + F) for 'tower', the first result looks pretty promising.

Switching back to wow.export and searching for that file in the model viewer, we can instantly see that we have the right model. That's the tower we're after!

That may seem like quite a few steps to jump through, but if we're just after a single building that we don't know the name of, it's far less hassle than importing the entire map tile (especially in newer expansions).

Enable the default doodad set for the WMO (for all of the props contained in the building) and then export it as an OBJ model.
After the model is done exporting, click the 'View in Explorer' option on the toast bar to find where the model exported to.

Back in Blender, we need to import the tower. To do this, we need to use the Blender add-on that comes with wow.export.
If you haven't already installed it, you can do so by clicking the Blender icon in the top-right of wow.export. Make sure to (save and) restart Blender after installing it.

To import the model, click File → Import → WoW M2/WMO/ADT and then browse to the model file that we just exported.

Providing everything went as planned, we should now have our wizard tower in the scene. You'll probably need to zoom out (mouse wheel) to see it.

Let's find a nice place to put our character. A quick and easy way to navigate a scene like this is to use fly mode (Shift + F) by default. You should now be able to navigate the scene using video-game like controls (WASD, QE, etc). To exit fly mode, just click in the viewport.

After flying around the building, I decided this would be a nice spot for our leaning mage character. To quickly bring them here, first find and select them in the Outliner.

In the 3D viewport, click on the floor in-front of the wooden pillar to place our 3D cursor there (Shift + right-click by default since 2.8).

Using the Snap menu (Shift + S by default), click Selection to Cursor. Our character should now appear where we put the 3D cursor.

You'll notice that they're probably not aligned or positioned perfectly. To adjust this, we'll use both the Move and Rotate transformers found on the left toolbar.

With some tweaking, our character should now be standing nicely where we want them.
Chapter 9: Lights
To see what our scene looks like when we render it, we can switch the Material Viewport to Rendered using the menu in the top-right of the 3D viewport.

As we can see here, it's pretty dark. What's the opposite of dark? Light. We're going to add lights. There are four main types of lights in Blender: Point, Area, Spot and Sun. For this interior, we're going to be working with the first two, point and area lights.

The first thing we want to do is get some general light in the room. To do this we're going to add an area light to the scene.

Since we want to light the entire room, we're going to place the area light high up in the room and scale it to cover. We'll set the light power to 1000W and give it a subtle pink hue.

To give the character a highlight, place another area light, this time much smaller and beside the character. Using a low light power of 50W and a slightly darker pink hue, this helps our character stand out against the background.

Next up, we're going to add a point light this time, in the stairwell of the tower. Using a strong power of 2000W and a dark orange hue, this gives us a soft light-flood effect which adds depth to the scene.

Finally, we're going to make the window in the back glow. I've covered this effect more in-depth in my WoW 3D: Common Mistakes And How To Fix Them post under the Flat Emission chapter.
Following that chapter, first select the tower and enter Edit Mode. Move over to the window and select one of the faces, this should highlight which material is used on the window.

We can see that the window is using the lt_human_window1 material (the mat_ prefix is added by wow.export, ignore that).
Bring up the texture viewer on wow.export and search for that filename. Conveniently, we can see that an emission mask (lt_human_window1_emissive) exists for this texture. Let's export that as PNG.

Back in Blender, switch the bottom panel back over to the Shader Editor that we had at the start of the guide.

Since we have the mat_lt_human_window1 material selected, it should already be visible in the Shader Editor. You should see three nodes in the tree: Image Texture, Principled BSDF and Material Output.

Go ahead and click on the Principled BSDF and hit the Delete key to remove it. Now add an Emission node (Add → Shader → Emission) to the tree.

In addition, we also want to add a Diffuse BSDF node (Add → Shader → Diffuse BSDF) and a Mix Shader node (Add → Shader → Mix Shader).
With all three nodes added to the tree, link them together as shown below. It's important that the Emission node connects to the second/bottom input on the Mix Shader here.

For the last piece of the puzzle, select the Image Texture (orange) node and duplicate it (Shift + D). Click the Open Image button on the duplicated node and find/select the emission mask texture we just exported from wow.export.

Connect the Color output of our new Image Texture node to the Factor input of the Mix Shader node we created a moment ago.
Additionally, set the Strength of the Emission node to 5; this controls how strong the light should be from the material.

If you've followed everything through to this point, good job. The lights we've set up are the very basics of lighting a scene; feel free to play about and get creative.

Chapter 10: Camera
Before we can render, we need a camera. A camera tells the rendering engine what part of the scene to render. Go ahead and add one to the scene.

You can move a camera around the scene like any other object, however we probably want to know what the camera can see. To toggle between the camera view, press Numpad 0.

By default, our scene will be set to render in a landscape (1920x1080) frame. Since our character is standing up-right, a portrait render would be more fitting.
To change this, go to the Output Properties tab and swap the Resolution X/Y values around from 1920x1080 to 1080x1920.

While we can see the boundaries of the camera on our screen, it can be hard to fully appreciate what is in shot and what isn't. To help us see more clearly, we can increase the passepartout in the Camera Properties.

Let's position our camera for the shot. While you could move the camera manually the same way you move any other object, that's fairly tedious.
Instead, let's utilize the fly mode that we explored earlier in the guide. Toggling to fly mode the same way we did earlier (Shift + F) while in the camera perspective allows us to move the camera around with video-game like controls.

Everything is starting to come together now. Don't forget you can switch over to the Rendered preview at any point to see how the final piece might look.

A key ingredient missing at the moment is depth of field. While not required, it definitely helps separate the character from the scene and give the scene some depth (hence the name).
In the Camera Properties tab, enable Depth of Field. By default, everything is probably going to get blurry.

If you know what you're doing, playing around with the Distance and F-Stop can get you very precise, clean looking results. For the purposes of this example however, we'll use the Focus Object helper, and select our character as the target.

That's it for setting up the camera, hopefully you have an idea of how to set one up. As with every chapter, feel free to experiment and branch out from the basics I've outlined.
Chapter 11: Action
In this chapter, we're going to focus on rendering. There's not much involved here, so let's get into it. By default in Blender, you've got a choice of two main rendering engines, Eevee and Cycles.

Eevee is a rasterization renderer, which means it's blazing fast. This uses the same methods that games use to produce hundreds of frames per second in real-time.
Cycles is a ray-traced renderer. Rays are cast from the camera which bounce around the scene collecting data, making the process slower but physically accurate, resulting in higher-quality renders.
I personally prefer to render in Cycles, but for the purposes of this guide we're going to use Eevee as it's instant and more user-friendly.
Another advantage Eeeve provides is a super easy to user Bloom filter. Go ahead and enable that under Render Properties tab, and you should instantly see some lovely bloom from the window we made. Play about with the settings!

Once you're happy, we can render. To do that, simply click Render → Render Image from the top menu bar.


Oh no! Our character has turned into a monster. When we hide objects in Blender, they're only hidden in the viewport, not the final render.
To resolve this, we need to adjust our Outliner filters to show the Disable in Renders option.

Once enabled, you'll now see a little camera icon next to each object, indicating if it's included in the render. We could go through and toggle them all by hand, but instead let's use some Python.
Switch the lower panel to the Python Console just like we did in the earlier sections and enter the following snippet of code.

It may be useful to macro this script, or if you prefer, there's an add-on called Match Render Visibility by Draise14 that does this with a single button click.
Go ahead and hit the render button once again, and you should now be presented with your render, free of horrible mutations.
If you're happy with the result, save the render to an image by clicking Image → Save As... from the top menu bar.

Chapter 12: Conclusion
If you followed this from start to finish, hopefully you now have a basic understanding of the process involved of creating WoW 3D artwork.
I would have loved to have included 20 more chapters delving into every facet of the process, but I purposely tried to keep this simple to serve as an entry-point for beginners.
If you run into any issues or have any questions at all regarding this guide, 3D artwork, WoW, Blender or wow.export, feel free to use the #champions-lounge channel on my Discord. It's there just for you!
Interested in more? Take a look at my other Patreon posts. Here are some guides I've made which follow on nicely from here:
WoW 3D: Character Models
WoW 3D: Item Components
WoW 3D: Common Mistakes And How To Fix Them
Are you looking to go to the next level? I've also got some guides for more advanced topics:
WoW 3D: Upscaling Textures
WoW 3D: Achieving In-Game Quality Terrain
WoW 3D: Everything About Foliage