Hello Starshiness!
I’m going to show you something very special today, I’ll be showing you my step-by-step process of how I worked on this project, a book cover for our dear Reina Cuervo’s book.
I will break down each process one by one, and at the end, I will share with you the editable file for anyone who wants to study my methodology more in-depth.
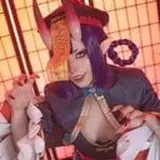
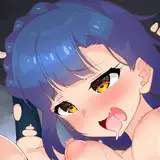
1.- Rough: First, we start with a basic sketch of the illustration, here we define shapes, positions, and actions of the characters, in this case, Aziraphale and Crowley. Also, in this step, we can add typography or elements that will complement the image, to give them composition. That way, we’ll know where the text will go.
2.- Color Test: Once our rough is finished and approved by the client, we’ll move on to color tests. Here it is important to define the colors that will be in the composition and how to harmonize them. In this stage, it's crucial to have knowledge of color psychology to apply the colors correctly.
3.- Light and Shadow Test: As the name suggests, once our color palettes are finished, we can do a light and shadow test, where we’ll define the direction of the main light, light bounces, shaded areas, etc.
4.- Character Pencils: Now with our rough, we can start detailing. In this process, the important thing is to give shape and structure to the characters, marking the style and expressions. In simple words, it's like a more detailed sketch.
5.- Background Pencils: Similar to the previous step, in this step, we detail all the objects or elements that will form our background or with which our characters will interact, in this case, the bookshelf.
6.- Lineart: Once we have the pencils for both our background and our characters, we’ll start outlining the shapes of the characters. In this step, it is important that the line is clean. Here we will also separate the shapes, giving meaning to the illustration.
7.- Color Blocking: With our color test approved, we’ll start filling in our lineart with the respective color, including background elements.
8.- Layout/Final Composition: In this stage, the final composition of the project is decided, taking into account colors, shapes, and elements. Backgrounds, dialogues, panels, etc., are also placed here.
9.- Texture and Shadows: In this step, we start giving volume to the shapes, as well as the reflections, highlights, and bounces required.
10.- Environment: Once textures are finished, we take our light and shadow test and start applying it to our illustration, giving it a very good finish.
11.- Final: Lastly, textures, shadows, or lights that need a touch-up can be added, softened, or removed. In this step, we simply fine-tune the previous steps, add the necessary elements, and it’s ready to deliver to the client.
These are all the steps I use in my illustrations. It should be noted that many times, due to my experience, I tend to skip steps that I do automatically.
I hope you enjoyed this mini tutorial on how I carry out my process.
Tell me, what do you think of it? Do you think I could improve it in any way?
I’d be delighted to read your comments.
---
Hola estrellitas!
Voy a mostrarles algo muy especial hoy, les voy a mostrar mi paso a paso de cómo trabajé este proyecto, para una portada de un libro de nuestra querida reina cuervo.
Les iré desglosando uno a uno cada proceso, y al final les mostraré el archivo editable, para quien guste estudiar más a fondo mi metodología.
1.- Rough: Primero empezamos con un boceto básico de la ilustración, aquí definimos formas, posiciones y acciones de los personajes, en este caso de aziraphale y crowley. También en este paso podemos agregar tipografías o elementos que van a acompañar a la imagen, para darles composición. Así sabremos que ahí va un texto
2.- Prueba de Color: una vez nuestro rough este terminado y aprobado por el cliente, pasaremos a hacer pruebas con color, aqui es importante definir que colores habra en la composicion y como armonizarlos, en esta etapa es importante tener conocimientos de psicologia del color, para poder aplicar los colores correctamente.
3.- Prueba de luces y sombras: Como su nombre lo dice, una ves terminada nuestras paletas de color, podemos hacer una prueba de luces y sombras, donde definiremos la direccion de la luz principal, los rebotes de luz, areas sombreadas, etc.
4.- Lápices de personaje: Ahora ya con nuestro rough, podemos comenzar a detallar, en este proceso lo importante es darle forma y estructura a los personajes, marcar el estilo y las expresiones, en palabras simples es como un boceto más detallado.
5.- Lápices de fondo: Al igual que el paso anterior en este paso se detallan todos los objetos o elementos que formarán nuestro fondo, o con los que interactúan nuestros personajes, en este caso es el librero.
6.- Lineart: Una vez teniendo los lápices, tanto de nuestro fondo como nuestros personajes, comenzaremos a delinear las formas de los personajes. En este paso es importante que la línea sea limpia. Aquí mismo separaremos las formas, dando sentido a la ilustración.
7.- Bloqueo de color: Ya con nuestra prueba de color aprobada, pasaremos a rellenar nuestro lineart con su respectivo color. Incluyendo elementos del fondo.
8.- Maquetado/Composición Final: En esta etapa se decide la composición final del proyecto, teniendo en cuenta, colores, formas y elementos. Así como también se colocan los fondos, los diálogos, viñetas etc.
9.- Textura y sombras: En este paso comenzamos a dar volumen a las formas, así como también los reflejos, brillos y rebotes que se requieran.
10.- Ambientación: una vez terminadas las texturas, tomamos nuestra prueba de luces y sombras y comenzamos a aplicarla en nuestra ilustración, dando así un muy buen acabado
11.- Final: Por último se pueden agregar, suavizar o eliminar, texturas, sombras o luces que veamos que necesitan un retoque, en este paso simplemente se afinan los pasos anteriores, se agregan los elementos que deben ir y está listo para entregar al cliente.
Estos son todos los pasos que utilizo en mis ilustraciones, cabe aclarar que muchas veces, por mi experiencia suelo saltarme pasos que ya hago en automático.
Espero les haya gustado este mini tutorial de como llevo mi proceso a cabo
Platíquenme ¿Qué opinan de ello? ¿Creen que podría mejorarlo de alguna manera?
Estaré encantada de leerlos en los comentarios