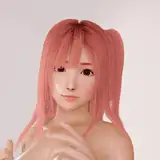
Here is part 3 of the process for my growth painting! Part 1 is here, and part 2 is here.
Some basic information about this process video:
This is part 3 of 3 parts in total - so the final part of the process.
The process has been sped up by 400% - so 4 times the original speed.
This painting took me a total of 10 hours to make.
At this stage, I mainly used the hard round brush from my own free brushset to blend and paint.
Some things to keep in mind while watching this video:
RENDERING CHALLENGES
Finalizing a painting is one of the hardest stages for me. That's because I tend to go into autopilot mode and start polishing everything up, but often find that this does not make the painting look better. In fact, it often starts to look worse, and that’s something that I'm actively trying to avoid. In this painting process, I ran into a lot of moments where I realized that the details that I added were not helpful and that I needed to start over. This happened especially often with a cluster of leaves in the bottom left, which I start working on about 24 minutes into this video. You can see me painting these leaves over and over again and then getting rid of what I did and starting over from the rough version. It got really exhausting after a while! Eventually, I realized that I had made my brush too small and I was creating details that were too defined and too sharp for this painting. I realized that the strength of this painting is the soft and dynamic feel, and the sharper leaves were taking the attention away from that. Even though I got stuck on them for a long time, it helped me to realize that I needed to work with a larger brush and I needed to create softer shapes that blended more into their surroundings. That was what this painting needed in order to feel unified and consistent. Sometimes you have to hit a wall in order to figure out which rendering style works best!
FOCUS ON EDGES
This is a tip that I've given quite often for rendering and finalizing a painting: focus on the edges! It can feel tempting to polish and clean every single area of the painting, even though that's usually extremely exhausting and overwhelming, and doesn't always lead to a better end result. My trick for that is to focus on the edges and the contours of the different shapes. I just go around the painting, usually from top left to bottom right, cleaning up and smoothing out those contours as much as I can. Usually by doing that, the painting starts to look cleaner without me having to polish every single surface area. Some parts can be left rough and expressive, but as long as the outer contours look clean, the image is readable and looks elevated and finalized. This is what I am mainly doing from 46 minutes onwards, until the image is done!
I hope you found this process helpful, and as always, feel free to ask any questions you may have after watching it! Your questions often spark tutorial ideas, so it’s always good to ask.
I also recorded some snippets of this process with my phone to turn into a reel/tiktok video later on. I’ll be posting that one in a minute!
Loish
2025-01-13 11:52:36 +0000 UTCAlana T.
2025-01-11 15:37:47 +0000 UTCLoish
2024-09-17 09:48:44 +0000 UTCIUBWORKS
2024-09-14 02:33:45 +0000 UTC