Hey Patrons!
Today, we're taking a look at a Supported Fish Pose. Fish pose is Matsyasana in Sanskrit. I usually hear teachers just call this a "chest opener" and there are many ways to do it, some which start to look like Supported Butterfly! Practice your chest opener to increase flexibility needed for the Half Bow photo set, coming up next!
In viewing this content, you certify, the content provided by Naked in Motion will not be redistributed or shown to anyone under the age of 18 without prior parental consent; you will create only one account and use it for your own personal purposes; and you won't share your password, give access to your account to others, or transfer your account to anyone else.
Viewer discretion is advised. You are responsible for knowing your limits! Remember to always listen to your body and make decisions that work for you. Skip anything you want, and take breaks when you need to. If something hurts, stop. Remember, more is not better, it's just MORE.
ARMS AND LEGS FOR ALL PHOTOS: You'll see me do various positions with the legs and arms. Feel free to mix and match as you see fit. Arms could rest open like Cactus, down by the body like Fish, hands on the belly, or stretch back by the ears. The legs might straighten together, relax apart, knees bent feet down, or form a Butterfly.
Take it easy getting out of all of these: put the hands or even elbows down next to you and press down to help you sit up. DON'T ROLL OFF TO ONE SIDE TO GET UP. Try to come out of the stretch the same way you came in.
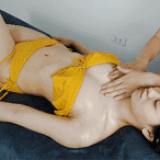
1) This is a milder version of the chest opener, which is good for warming up, warming down, or in general for people like me who have a rounded upper spine. A little goes a long way here: roll up a towel in a cylinder shape so that it's about 4 fingers high (ish). The location of the support really depends on the day and the person. It's also okay to try moving the support to different spots to see what feels best for you.
The main point is that you put it under your upper back. A good rule of thumb is to lie down so that the base of your shoulder blades are on the apex of the towel. That's where I've got it in this top photo with my arms resting out in Cactus. In the bottom photo the towel is a bit lower (the bra-strap area) and I'm reaching my arms back for a stretch, but feel free to explore.
2) Same idea as #1, but instead of straight legs, I'm in Butterfly. These pictures just show different arm variations you might take. The ones with straight arms are more for a stretch in the triceps and increase the backbend by bringing weight backward, and the Cactus arms are just about relaxing into the stretch.
3) This photo shows some more options using towels or even pillows. In the top photo, I've stacked two towels up folded vetically. I sit in front of the support so my hips are still on the mat and lie down, and I personally need some support for my head, so I've rolled up the back of the towel to help lift.
In the middle photo, I've stacked two pillows behind me instead. Again hips are still on the mat as you drape your spine over the support, making sure head is supported as well. You might feel okay here, but I needed more lift for my head so I combined the two...
...as in the last photo: I put the long stack of towels over the middle line of the pillows. This gave me more lift as I lay down, but also allowed me to roll up the back edge of the towel to lift my head. These are just a few examples of props you can use at home, but feel free to try different pillow/towel combinations to make you more comfortable.
4) If you have blocks, try configuring them like the top left photo: one block horizontal on the lowest setting and one horizontal on the medium setting. You sit your hips down on the mat and carefully lower your spine down on the supports so that the base of your shoulder blades is on the lowest block and your head is supported by the middle block. This is more like Supported Butterfly, but it's just another variation on straight legs.
The bottom photo is like the middle except there's no block under my head. Hips down, low block horizontal under base of shoulder blades, and head has carefully been placed down so the top/back of the head rests on the mat. You could just lower your arms alongside your body like Fish, but I since I already had the support of the block, I thought I'd stretch the arms back to increase the stretch. My upper body is very tight, so my head just barely is able to sit comfortably on the mat with my blades on the lowest setting. I've seen people in a similar shape with a medium or even high block setting, which I can't demonstrate, but take it slow as you figure out what works for you.
5) As the blocks get progressively higher, it makes the backbend more intense. Take your time to work up to these. Now I've set up both blocks on the medium setting. The top two photos show two different configurations. In the top left photo, the first block will go right under the base of the shoulder blades. In the top right photo, the first block goes vertically instead. You can see my blocks in this shape in the photo: sit the hips down and ease back so that the rib cage and upper back are supported along the first block, so thoracic spine is right on top of the block, and the head is supported. This is not particularly comfortable for me, so I tend to make the block for my head higher, like the following photos.
6) The top left photo shows the block configuration in the left and bottom photo: first block is horizontal on the middle level and head block is on the highest setting. Again, first block goes under base of shoulder blades, and high block supports the head. You could open your arms to the side just to enjoy the stretch. When we do Fish without support, we usually have forearms pressing down next to the body to help lift, but since the block is doing that work, you might also reach the arms back for a stretch.
The top right block shows the first block vertical on the middle setting and head block on high, as I'm demonstrating in that top middle photo with the medium setting block right underneath the thoracic spine (rib cage and upper back).
7) The middle photo is just a happy medium between the top and bottom photos. If you don't have two blocks, or they are uncomfortable under the spine, but you can't configure your pillows enough to support your head, you could turn your pillows horizontally instead, hips down, drape rib cage/upper back over, and put the head on whatever setting of the block is most comfortable. The pillows going horizontal like this are meant to replicate a yoga bolster going this direction, which I don't have.
Bradley Donovan
2020-09-10 07:51:50 +0000 UTCBradley Donovan
2020-09-10 07:50:19 +0000 UTC