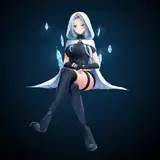
This month we explore our must sensual desires, in what has been one of the most highly requested collections to date. Just in time for the most romantic night of the year, we present nine Lingerie looks that will look just as good on you, as they will thrown on the floor… 😏
These items are BLENDER ONLY. They will not work in your Sims games. To use them simply append them into the scene where you have your nude sim, then sculpt the garment to better fit your sims body. I normally select the elastic deform tool and make sure the X axis symmetry is turned on. The last step is to assign your sims rig and you are good to go.
Some Looks have multiple swatches. You can change them by simply dragging the desired color from the Node Group Node to and attaching it to the Base Color on the Principal BDSF.

On all of the Fur Shrugs I have hidden the Interpolate Hair Curves Modifier for easier viewport use. To see the fur in full simply unhide it in the modifiers tab.

The Tights are made with a SHRINKWRAP Modifier. Minimal sculpting is required, you just need to line up the bottom of the tights with the bottom of your sims foot. From there go to the modifiers tab and assign the Shrinkwrap to your rig as you would the clothing. It should form around your Sim's legs. IT IS IMPORTANT TO THEN APPLY THE MODIFIER! If you do not apply the modifier the tights will snap to other parts of the body while posing. Minimal sculpting adjustments may be required after applying the Modifier.

All Looks that have CRYSTALS use a Particle system to create beading. The origin objects are in their own Collection and YOU MUST HAVE THIS FOLDER IN THE SCENE YOU PLAN TO USE FOR THE PARTICLES TO WORK! You can hide the collection or move the objects out of the camera frame but if the collection is not in the scene the particles will not work. These particles can also be quite heavy, if you do not have a strong computer, I recommend lowering the Display and Render amount in the Children Settings
There is a slight issue with the all of my Heels. If you use the Dallas Girl Tip Toe foot mesh there is no problem, however if your sim has been sculpted with a Key Shape that moves your feet from flat, to tip toe, the weights of the shoe have issues recognizing the weights of the foot. You will need to do some minor sculpting once you have posed your sim.
WITH ALL MY SHOES I recommend placing the shoes approximately in line with your foot, and then SCULPT YOUR FOOT TO MATCH THE SHOE. This will be much easier than trying to sculpt the shoe without deforming it too much.
I highly recommend deleting all parts of your sims body mesh that are covered by the clothing. This will prevent clipping and lower the polygon count, which will hopefully speed up render times. ESPECIALLY for the Gloves and Boots, as well as the Tights.
All of the garments are made with custom image textures, however the colors can be easily adjusted by using the Color Ramp node between the Image Texture Node and the Principal BDSF. to keep the depth of the texture make sure you have a darker and a lighter color on the ramp. Of course feel free to change garments to any color you would like.
These garments are very high poly, it’s the only way to give you the quality you deserve. I recommend working in Solid View and Hiding Particles while placing your sim in blender. This helps reduce lag in the 3D window. That being said, depending on your computer specs they should Render reasonably quickly.
I hope you enjoy and don’t forget to tag @hensley.atelier so we can see your photos and share your work!!
https://www.mediafire.com/file_premium/wzjkosgako24yid/Collection_23.zip/file