I got asked for a quick rundown on using the camera tools for Baldur's Gate 3. This won't be a comprehensive guide, just a few tips.
Baldur's Gate 3 doesn't come with its own photo mode, so Frans Bouma (otis_inf of ReShade and SRWE fame) has made a tool to give us control over the camera. It also has built-in hotsampling, so there's no need to run SRWE alongside it. You can find the download information here on his page, and it also covers a lot of information about installing it and using it. I'll assume from this point you've already downloaded it and are ready to go. *Note: the camera tools require subbing to his patreon.
Below I'll run through the important parts of the interface, before going through how I use the tools to set up a screenshot.

1) When you open the the tools this is the screen you'll see. You press the button under Window title for the camera tools to hook in to the game process. Then you'll see it populate the two text boxes like above (but with your own path to the game). *Note: remember you need to be using the DirectX11 version of the game, and run the game in Windowed mode.

2) On the left are all the different sections you might need, so go ahead and have a little explore through them. If you've used otis' SRWE for hotsampling before you'll be familiar with this screen. For now, go ahead and click 'Fake Fullscreen'. The screen will re-render to seamlessly match your monitor resolution. You can go ahead and play the game now as normal, and come back to the tools whenever you want to take a screenshot.

3) You'll see in the central column there are already some common resolutions and aspect ratios for you to pick from. I'll assume you are already familiar with hotsampling (if not you can read my tutorial on hotsampling with SRWE), and so know which to pick when you're setting up a shot and which to pick when you're ready to take the shot. If the resolution you want to use isn't already there, you can add it yourself using the width and height boxes on the right. The last few sizes you used will be listed under 'Recently used resolutions' so you can quickly pick them again.

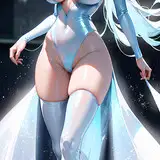
This is what your screen will look like when you're hotsampling at a large resolution, but don't fear

This is what the final screenshot will look like. Hotsampling creates a picture that is bigger than your monitor, so you can't see all of it. When you take the screenshot (I use ReShade to take mine) it will show the whole picture.

4) Going down the list of tabs, under Configuration you'll find sliders that help change the movement speed of the camera. You can also specify whether you want to use keyboard & mouse, gamepad, or both for camera input. I use both: I use the gamepad for all the camera movement, and the keyboard for a couple of specific commands like reset fov and roll. Some of the sliders might need different settings depending on which method you use. I had to drop the FoV zoom speed right down when I started using the gamepad, for example.

5) Under Image Adjustments you can control the game speed (to slow down a fight to get the perfect shot, for example), and can also check the Higher LODs box, which will render far-away objects and scenery with more detailed models. This may impact your performance depending on your PC.


6) Under Key Bindings and Gamepad Button Bindings you can see what controls the camera movement, and change it if you want. I swapped over move camera up/down because it felt more intuitive the other way to me. Use them as they are to begin with, and see how you get on.
When I want to take a screenshot first I press Numpad 0 to pause the game. Then I press Insert to activate the tools, and Delete to remove the HUD. Then I'm ready to start moving the camera.
Next, I grab my gamepad because I find moving the camera a lot easier with it (I have an old xbox wired controller, I don't know the full range of controllers that work, but remember you can still use the keyboard and mouse if you need to).
I use the sticks to swing the camera round to roughly where I want to look, and then use up and down on the D pad to adjust the FoV (field of view, this is how zoomed in the picture is). The triggers control up and down movement, and left/right on the D pad will roll the camera from side to side. *Note: pressing Numpad 2 will reset the roll position, and Numpad * will reset the FoV.
You can speed up the camera movement by pressing Y, and slow it down by pressing X, if you don't want to keep adjusting it in the menu. This can be useful for getting pixel-perfect positioning without overshooting your mark.
At some point during all of this I hop over to the Hotsampling window to set up the aspect ratio I want to take the picture in. Sometimes I might already know what AR I want, other times I might decide on it once I've found a good shot.
Once I'm happy with my composition I press Home to block camera movement so I can move my mouse freely without it moving it unexpectedly. Then, I usually take a quick test shot to take a look at in Explorer to make sure it looks as I want it to. I find this really useful because seeing it at a smaller size on your screen can help you get a better idea about proportions than when it's filling your entire monitor. If all is well, I choose the larger corresponding resolution and wait for it to render on my screen at the bigger size. Then I take the screenshot and change back down to the smaller resolution again. If you want to continue taking more shots, don't forget to press Home so you can move the camera again.
When I've finished taking screenshots I press Numpad 0 to unpause the game, I press Delete to show the HUD, and I press Insert to turn off the camera tools. Sometimes at this point the camera can get a bit buggy and do weird things. If this happens, first of all press Home and it should snap back to your character. If it doesn't, you may need to turn the camera tools on and off again with Insert, and press Home once more. This is just a quirk of how the game writes its frames to memory, sometimes you need to tell it to update them.
tl;dr of the above:
Once you've played around with the camera tools a couple of times it should become second nature. Definitely look into using a gamepad if you can (you can still play the game with kb&m) because moving the camera is a lot easier that way.
You can do more advanced stuff with the tools using the camera paths interface. I haven't used that yet so I can't give any advice. I'm guessing it works a little like setting up and moving between camera states in The Sims 4 (for those of you here from that game).
Once you're a dab hand with the tools, you can look into getting otis' IGCS Connector and Depth of Field addon for ReShade (free). This adds the option of a superior type of DoF that will really elevate your shots. Be warned, it's very resource intensive. It doesn't work in the same way as regular ReShade DoF shaders. It's purely for screenshots. It renders an image using hundreds or thousands of individual frames/shots to create super smooth and accurate physical DoF with none of the weird quirks that DoF shaders have (like weird halos around hair, or transparent objects becoming blurred). I have a 980ti gpu and it takes me upwards of 10 minutes to render a shot when hotsampled. If you have a better gpu than me (you probably do!) it'll likely be quicker for you. I won't make any kind of tutorial for that because everything you need to know is explained on the page linked above, there's nothing more to it than that!